Duct Dynasty: Residential Duct-leakage Testing
A properly executed duct-leakage test reveals a lot about an HVAC system’s health
|
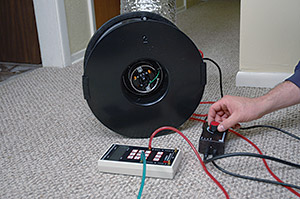
| AIR REPAIR: Duct-leakage testing kits are typically made up of a duct-testing fan, pressure gauge, speed controller tubing, and flexible duct. |
HVAC professionals across the country are experiencing a recent change that is driven by energy codes. This change is related to duct-leakage testing on new and often retrofitted HVAC systems.
A lot of questions from professionals across the country have popped up as a result of this change. Many are wondering exactly what’s involved in this test, the equipment that’s needed, third-party testing, and how to pass these tests. Let’s take a look at some of the basics for residential duct-leakage testing.
DUCT-LEAKAGE TESTING EQUIPMENT
The heart of duct-leakage testing equipment is the duct-leakage fan. This small, variable-speed fan is used to pressurize or depressurize the duct system after supply and return openings have been sealed. This fan is usually controlled by an adjustable-speed controller and powered from a 120-V receptacle.
A pressure gauge is an instrument that’s used in conjunction with the duct-leakage fan to imply the amount of duct leakage through the duct system. The pressure gauge has more functions than determining airflow through the duct-leakage fan. It can be used to measure building pressures, static pressures, and airflow with recognized accessories. Once its true potential is learned, it often becomes a go-to test instrument beyond duct-leakage testing.
Additional accessories include pressure tubing, fittings, and flexible duct with a collar to complete the kit for performing a duct-leakage test. These will be needed to connect the test equipment to the duct system. Be sure to do your homework if you consider investing in the equipment to perform these tests.
DUCT-LEAKING TESTING PROTOCOLS
To perform a duct-leakage test, follow these basic steps. Failure to do so can often end in a lot of frustration and questionable results. Knowing what’s expected can help you prevent a lot of unnecessary headaches.
Remove the air filter from the HVAC system. If the filter is located at the air-handling equipment, it will need to be removed from the filter rack. If filter grilles are used, the filter must be removed if the duct-leakage fan is attached to the system through that particular grille.
Looking for quick answers on air conditioning, heating and refrigeration topics? Try Ask ACHR NEWS, our new smart AI search tool. Ask ACHR NEWS
All supply and return openings must be sealed to allow the duct system to be pressurized or depressurized. This is often accomplished by using large rolls of duct-masking tape to seal any of these openings. Aftermarket kits are also available that use gasketed pans to complete the seal if supply registers and return grilles are in place.
If the system has any intentional ventilation openings from an energy recovery ventilator (ERV), heat recovery ventilator (HRV), or outside air duct, they need to be sealed off, as well. These will show up as duct leakage if they’re left open. Once completed, choose a proper location to measure duct system pressure. Many experienced duct testers obtain this measurement from a supply register that is closest to the air-handling equipment.
PRESSURIZATION OR DEPRESSURIZATION
Depending on your local energy codes, a specific duct-leakage test might be required. The two types of testing are: pressurization, where air is blown into the duct system, and depressurization, where air is pulled from the duct system. The HVAC system fan remains in the off position throughout the test.
Ducts are typically tested at 25 pascals (0.10-inch water column) of pressure. Once the ducts are pressurized or depressurized to the proper test pressure, the amount of airflow is read through the fan and is usually displayed on the pressure gauge. This is interpreted to be the amount of existing duct leakage. This airflow value is referred to as CFM25, as it describes the condition of the airflow measured through the fan.
ENERGY CODE REQUIREMENTS
To determine if the measured duct leakage meets energy code requirements, it needs to be compared against a set parameter. Most codes use CFM25 per 100 square feet of conditioned floor area for this comparison.
The two most prevalent codes currently being used are the 2009 and 2012 International Energy Conservation Codes (IECC). There are various leakage rates allowed depending on the types of duct leakage test being performed. The 2009 IECC has leakage rates ranging from 12 CFM25 per 100-square-feet cfm to 4 CFM25 per 100-square-feet cfm while the 2012 IECC ranges from 4 CFM25 per 100-square-feet cfm to 3 CFM25 per 100-square-feet cfm. An interesting note is that duct-leakage testing isn’t required if the air-handling equipment and all ducts are located inside the conditioned space.
To give you an idea of how CFM25 per 100 square feet is calculated, let’s look at an example house that has 2,000 square feet of conditioned floor area being served by a single HVAC system. A duct-leakage test is performed and it’s determined there is 72 CFM25 of duct leakage. The values of 2,000 square feet and 72 CFM25 can now be plugged into a formula to determine duct leakage per 100 square feet of conditioned floor area.
Note: Many test instruments are capable of doing this math for you automatically.
CRUNCH THE NUMBERS
The duct leakage formula would be similar to this as a final calculation:
72 CFM25 ÷ 2,000 ft2 x 100 = 3.6 CFM25/100 ft2
If you needed to meet 4 CFM25 per 100 square feet as a leakage rate, you’ve passed. If 3 CFM25 per 100 square feet was your goal, you have some investigating to do. Most likely, there are some leaks that didn’t get sealed.
PROTECT YOURSELF FROM INACCURACIES
There will be occasions when a duct-leakage test fails. If it does, double-check some of these common defects:
• No or inadequate duct sealant;
• Improper duct sealant applied;
• Duct sealant applied in the wrong places;
• Building cavities used as returns;
• Panned floor joist;
• Masking tape came loose during the test;
• Missing grommets and gaskets;
• Duct chases improperly sealed;
• Boot to drywall connection not sealed;
• Filter rack not sealed;
• Take-offs and start collars not sealed;
• Plenum connections not sealed;
• Platform returns improperly sealed; and
• Leaky equipment cabinets.
If none of these defects exist, make sure the test was performed correctly according to the manufacturer’s instructions. It’s easy to make a mistake when testing in the field.
There’s also a level of anxiety that comes with having your work tested by a third-party professional. If this is necessary in your area, you can prevent this anxiety by being proactive. Test your own work before the completion of the job. This will ensure similar results with no unexpected surprises.
WHAT TESTING DOESN'T ACCOMPLISH
While duct-leakage testing quantifies one aspect of a properly operating system, it doesn’t quantify them all. Remember, the HVAC system is not in operation during this test. Fictitious conditions are being created to determine leakage rates. No HVAC system operates with the grilles and registers taped off.
Proper sizing, insulation, airflow delivery, air balance, and static pressure still need to be verified beyond duct-leakage testing. This enables you to ensure a properly operating system that delivers what your customers are investing in.
Publication date: 6/15/2015
Want more HVAC industry news and information? Join The NEWS on Facebook, Twitter, and LinkedIn today!
Looking for a reprint of this article?
From high-res PDFs to custom plaques, order your copy today!