Ignoring Advice on Nitrogen Purging Can Mean More Headaches for HVACR Contractors
Nitrogen purging while brazing refrigerant tubes takes only a few extra minutes, but many installers don’t recognize its importance

A simple installation step HVAC equipment manufacturers recommend is often skipped by contractors, resulting in early equipment failure and inefficient operation. Nitrogen purging while brazing refrigerant tubes takes only a few extra minutes, but many installers don’t recognize its importance.
When Dave Garvin, senior manager of residential customer support, Nortek Global HVAC (NGH) worked as a contractor earlier in his career, he and his coworkers didn’t realize the importance of nitrogen purging. Now that he is employed at an HVAC equipment manufacturer, he has a better understanding of why it is critical when installing or repairing equipment.
Avoiding nitrogen purging continues to be a major issue in the industry.
According to Garvin, whenever a problem occurs with a recently installed HVAC unit, one of the first questions manufacturers and contracting firm management should ask is “Did you perform nitrogen purging?”
When this step is not taken, equipment failures may occur well before life expectancy is up. Here’s why: During brazing, a heavy black oxide forms on the inside of the tube. As it cools, the oxide flakes off to form “scale,” which is then carried by the refrigerant throughout the system, contaminating filter driers, compressor oils, and valves. This build-up of oxide jeopardizes the efficiency and life of the equipment.
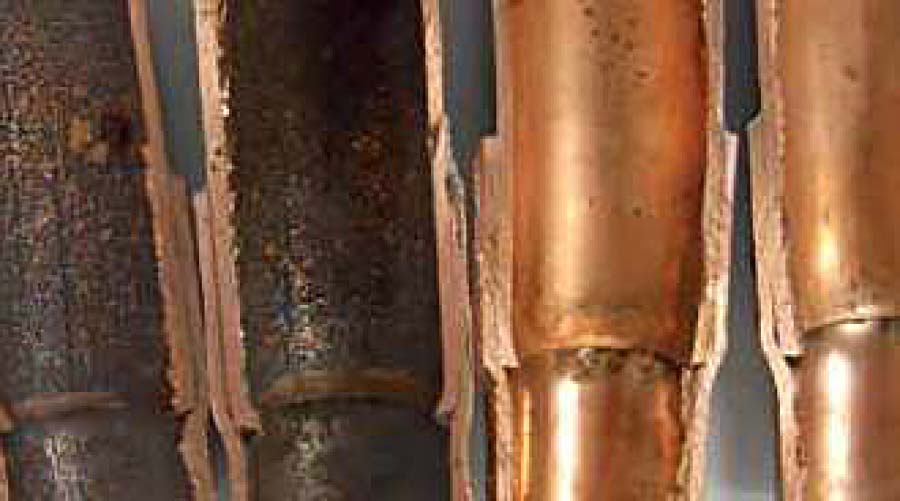
SIDE-BY-SIDE: A comparison of nitrogen purged versus non purged.
“When oxides clog up the fine mesh screen, it restricts the flow of refrigerant and the system stops cooling or heating,” Garvin said.
Garvin doesn’t just preach the importance of nitrogen purging for contractors but says it’s a critical step taken every time a production employee at NGH makes a brazed joint.
Looking for quick answers on air conditioning, heating and refrigeration topics? Try Ask ACHR NEWS, our new smart AI search tool. Ask ACHR NEWS
“Our production line is setup so that the flow of nitrogen is controlled at the same time as the control of gas,” he said. “Our technicians lift the torch, light the flame, and nitrogen automatically starts flowing during brazing. We even have a visual reminder that shows the nitrogen is flowing.”
Because nitrogen purging is such an important step, Harris Products Group, a manufacturer of brazing equipment, puts a strong emphasis on it during contractor training sessions. This ensures that technicians not only understand how to do it, but why it must be done.
The Cost of Avoidance
Repairing HVAC equipment damaged by oxide flakes in refrigerant lines can be time-consuming. To fix the problem, the distributor or TXV assembly must be replaced or cleaned, and the liquid line filter must be changed.
“You have to pull all of the refrigerant out of the system, then put it all back together, which is costly,” Garvin said. “It’s a four-hour call. You might not be able to charge that time to your customer.”
The number of brazed joints that are involved will impact how long the repair work will take, he added.
“As much as OEMs preach nitrogen purging, unfortunately there are techs who are not doing it,” Garvin said.
Problems associated with oxidation formed during brazing is not a new phenomenon, but it increased significantly in 2010, when R-22 was replaced with R-410A. The latter uses POE oil, which has a solvent effect and “scrubs” the copper tube walls, loosening scale that then circulates through the system. The upcoming shift to A2L refrigerants by 2025 poses another concern: safety, since it is mildly flammable.
“Contractors are going to have to slow down and take their time and be very careful with the new refrigerant,” Garvin said.
Regardless of the type of refrigerant in the pipe, nitrogen purging is necessary for proper equipment function. In the long run, contractors will save time and money by performing this step. Rather than return visits to fix equipment clogged with oxide particles, they can focus on new installations and repairs that bring in good revenue.
Always take the time to nitrogen purge. It’s a simple process that will save money in the long run and keep customers happy.
Nitrogen Purging Steps
Nitrogen purging involves flowing nitrogen gas through copper pipes during brazing. The purpose is to prevent oxidation, which is a common cause of early equipment failure. Taking the following steps will eliminate the problem of oxide flakes circulating through the equipment, clogging it, and causing premature failure.
- Nitrogen is typically introduced into the system through the Schrader valve (after removing the core) or other system opening. A small hole in a cap at the end of the line is needed to allow the nitrogen to escape.
- Connect a hose or tube from the nitrogen cylinder to one end of the pipe. The cylinder will be equipped with a regulator or flow control valve.
- Choose a pressure setting. There is no universal requirement for the delivery pressure setting, but the goal is to use low volume/pressure to displace the oxygen. A suggested starting point is 2-3 CFH or 1.5-2 psi. Some users will set pressure until they feel a slight flow on the back of their hand. It's good practice to initiate flow before heating and continue to flow nitrogen until the part has cooled.
- Avoid an excessive flow rate that builds pressure inside the tube. A high flow rate will tend to cool the tube, reducing brazing heat efficiency. Excess nitrogen pressure can build up inside the tube and reduce braze alloy penetration. A small hole in a cap at the end of the line will allow the nitrogen to escape.
If you are new to nitrogen brazing, experiment with flow rates by practicing at your facility. Section the finished assemblies and inspect for a clean inner tube wall. This will allow you to make sure you have mastered the procedure before performing it on a customer’s system.
Remember to always purge with nitrogen when brazing refrigerant piping so you can prevent damage from oxidation scaling down the road.
Looking for a reprint of this article?
From high-res PDFs to custom plaques, order your copy today!


