Static Pressure Test a Building to Expand Your Diagnostics
These tips will improve your offerings to customers
Last month, we looked at building pressure essentials to help you understand how they affect HVAC systems and customer comfort. If you remember, the building acts like a duct system and HVAC system extension.
Uncontrolled building pressures can cause problems inside a structure the same way excessive static pressure can in an HVAC system. If you ignore this, it can limit your troubleshooting ability and cause you to recommend solutions that might not address your customer’s concerns.
Let’s look at some helpful “static” pressure tests you can use on the building side of the duct system to diagnose common problems.
TEST INSTRUMENTS AND ACCESSORIES
Before you can measure building pressures, you’ll need the following:
- Digital micromanometer — capable of measuring low pressures;
- Various lengths of pressure hose — 10-foot up to 50-foot lengths are recommended;
- Aluminum hobby tubing — to place underneath doors and prevent pinched hoses;
- Couplings and tee fittings — to extend hose lengths; and
- Wind buffering pot — email me for a procedure on how to make one.
The biggest investment you’ll make is the digital micromanometer. Some of the recommended accessories might seem excessive, but you’ll need them sooner or later.
Building Pressure Measurements
You’ll measure building pressures in Pascals (Pa). It shows small pressures in whole numbers. To give you an idea how small the pressure units are, 1 inch wc = 250 Pa.
To break this number down a little further, 1 Pa = .004 inches wc. That’s an extremely small amount of pressure to measure, which is why you need a micromanometer. A standard manometer isn’t sensitive enough to measure pressures this low and will typically display “0.”
HVAC-RELATED TESTING
For purposes of this article, there are a few basic tests that we’ll examine. There’s a lot more testing that you can do as your skills progress, but you have to start somewhere. At first, it’s best to stick with testing that ties directly to the HVAC system.
Looking for quick answers on air conditioning, heating and refrigeration topics? Try Ask ACHR NEWS, our new smart AI search tool. Ask ACHR NEWS
The purpose of any building pressure test is to see what happens under different conditions to determine if an HVAC-related problem is the cause. HVAC-related testing is typically broken down into two steps.
- Turn the air handling equipment on — this shows you what happens when the blower runs on its highest speed and all interior doors open.
- Close interior doors — this builds on the HVAC blower test to show what happens when you close the building’s interior doors one at a time.
There are a couple of limitations you need to be aware of before you begin. First, the tests don’t work that well on leaky buildings; it must be tight enough to register a pressure difference. So, if you consider testing a tobacco barn, you will be disappointed. Second, wind will mess with your results. Use a wind buffering pot to minimize the interaction, but understand that testing in gusty conditions may lead to inconclusive results.
As you perform these tests, your explanations must be simple and tied to an HVAC system problem. If they aren’t, you’ll confuse your customer, and they’ll lose confidence in you. The minute you start to talk building science lingo, you’re toast.
TESTING PREPARATION
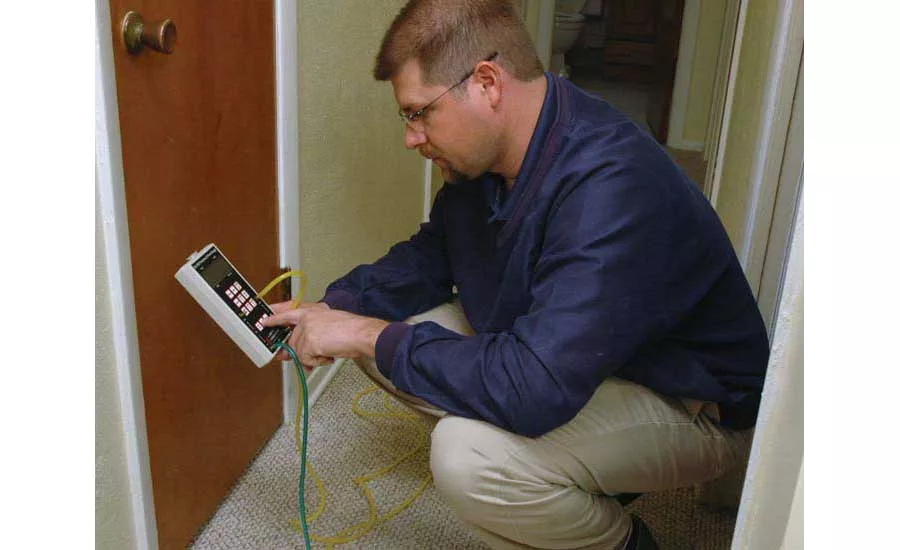
Before you test, you’ll need to run a pressure hose outside the building. Don’t run the hose to an attic or a crawl space because these areas aren’t truly outdoors. The indoor hose end attaches to the micromanometer, while the outdoor hose end attaches to the wind buffering pot.
To ensure accurate readings, make sure that you don’t pinch the test hose as it runs outside. I like to use a small piece of metal hobby tubing underneath an exterior door’s threshold as a coupling in the hose to avoid this. Check all exterior doors and windows to assure they’re closed. You’ll also want to make sure that all interior doors are open. The HVAC system and any exhaust fans should be off when you begin the test.
Once you turn on the micromanometer and attach the outside hose, you’ll measure base pressure. It’s the building’s pressure under natural conditions. Wind and stack primarily affect this reading.
Before you turn on the HVAC blower, you’ll want to record your reading for future reference. Then, use a zeroing feature on the micromanometer to cancel out the pressure so you start from a true zero reading.
TURN ON THE AIR HANDLING EQUIPMENT
Next, turn on the air handling equipment to see what happens to building pressure. The test works best when the duct system location is outside the conditioned space, such as in an attic or crawlspace. Duct systems inside the building, such as a basement, may not show up as severely.
Make sure the blower runs on the highest speed it would during normal operation. For most systems, this would be cooling operation. If you have a variable speed (ECM) blower, make sure it’s up to full speed before you check the pressure reading on the micromanometer.
If you see a negative pressure on the display, there’s a good chance the supply duct system leaks more air than the return duct system. The building will pull into a vacuum as more air is pulled than supplied to it.
If you see a positive pressure on the display, the return duct system probably leaks more air than the supply duct system. The building will “blow up” as more air is supplied than pulled from it.
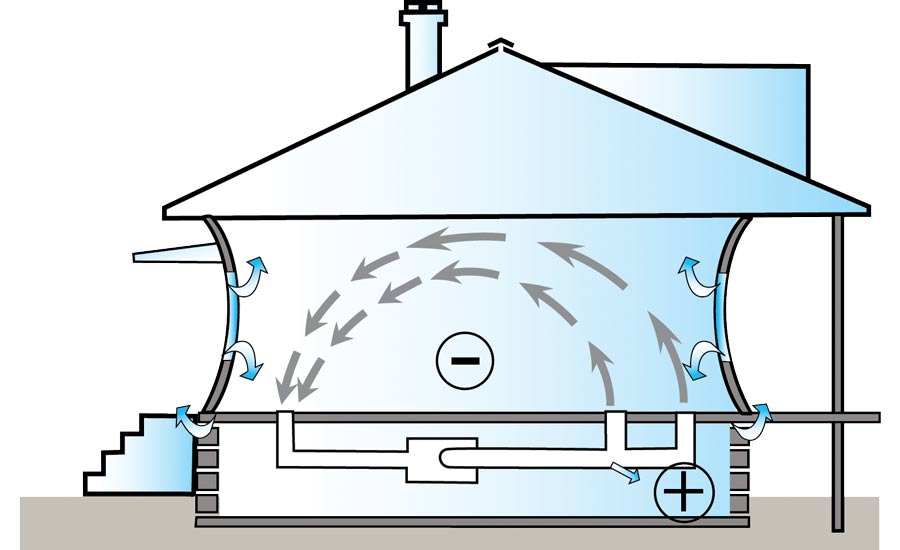
FIGURE 1: When a supply duct system leaks more air to the outdoors than the return duct system, the building will pull into a vacuum.
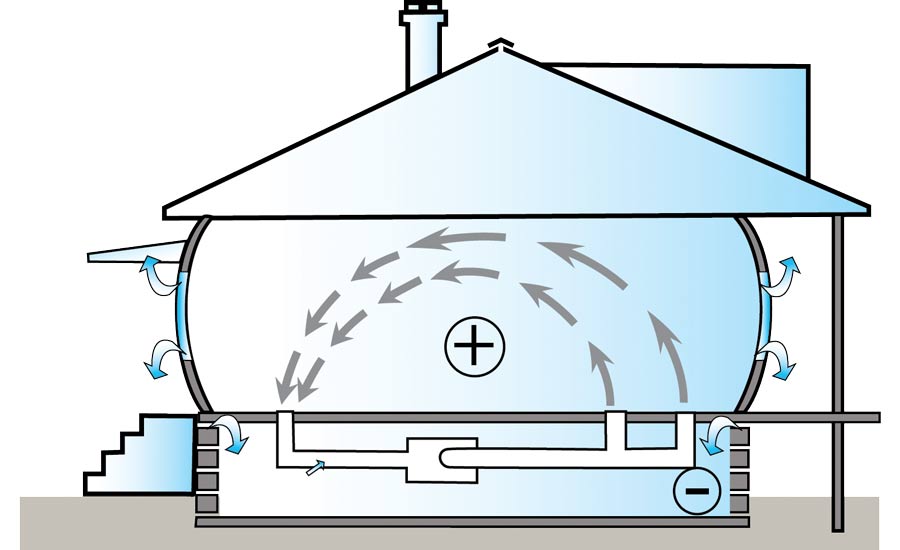
FIGURE 2: When a return duct system leaks more air to the outdoors than the supply duct system, the building will “blow up.”
What if there is no pressure change on the micromanometer display? Here are a few possibilities to consider.
- Most of the duct system is inside the building.
- You have equal supply duct and return duct leakage.
- The building is too leaky to contain any pressure change.
- Your system is awesome, perfectly balanced, and there’s no problem!
If you see a zero Pascal reading, you’ll need additional measurements beyond this basic test to know if and where the problem is. Proceed to the next step to see what happens when you close interior doors.
CLOSE INTERIOR DOORS
Begin closing interior doors to see what happens to building pressure. Remember, interior doors act like dampers and could cause pressure and airflow imbalances once their position changes from open to closed. Pay special attention if the building has a central return and/or rooms with only supplies in them.
You’ll need an additional hose with a small piece of metal hobby tubing on the end to slide under each door to measure room pressure. Most micromanometers have two channels that allow you to measure two different pressures. Your outside pressure is often shown on the first channel. Attach the additional hose to the second channel to measure room pressure.
Begin to close interior doors one at a time, starting with the room the customer is most uncomfortable in. Once you close a door, slide the hose underneath to measure room pressure. Any pressure differences greater than +/-3 Pascals need further diagnosis and corrections. As you close more doors, continue to monitor and document the main living space pressure.
Once you’re finished, set the interior doors back how you found them and return the building’s thermostat to its normal setting.
If there are exhaust fans in the building, you can also turn them on to see what happens to building pressure. It’s cool to show what happens when a huge kitchen exhaust fan kicks on. It’s a simple way to end the “I don’t need any makeup air” argument.
OFFER HVAC SOLUTIONS
Once you have your test results, find what triggers any unacceptable pressure changes and look for ways to fix it. Each step is a process of elimination. As you move from one step to another, you see a clearer picture how the HVAC system changes building pressure.
However, there are times when a building pressure test is insufficient, like static pressure for an HVAC system. Both tests must be kept in context. You may need more measurements to find deeper problems and gain additional information.
If you discover your problems are tied to the duct system, you might need additional measurements such as static pressure and airflow to determine a solution. Some common HVAC repairs are:
- Duct renovation to correct poor design and installation;
- Seal duct leakage;
- Air balancing;
- Jumper ducts to relieve room pressure; and
- Outside air ducts to provide ventilation and counter building leakage.
You’ll discover some issues that are beyond an HVAC professional’s scope of work and need more advanced testing with a blower door and/or thermal imaging camera. If a customer’s lack of comfort is tied to the building instead of your HVAC system, you need a way to differentiate between the two and help them determine the best solutions.
If you’re an HVAC contractor or technician interested in learning more about building pressure, contact me at davidr@ncihvac.com or call 800-633-7058. NCI’s website www.nationalcomfortinstitute.com is full of free technical articles and downloads to help you improve your professionalism and strengthen your company.
See more articles from this issue here!
Looking for a reprint of this article?
From high-res PDFs to custom plaques, order your copy today!


