
Second of Two Parts
Last week we discussed the basics of gas boiler wiring and wiring in general. Now let’s add safety and limit controls for each type of system. I’m going to start with a steam boiler, since it is the least complex and the easiest to understand. A steam boiler uses a pressure control that opens on pressure rise and a low water cutoff (LWCO) that opens when the water drops below a predetermined level.
LOW WATER CUTOFFS
First let’s talk about LWCOs a little. There are two types of LWCOs, float types and probe types.The float type is installed in a water column (on residential boilers, usually the gauge glass); a float opens and closes a switch as the water level changes.
The probe type installs into the boiler water and uses the water in the boiler to close the circuit. Most manufacturers of residential boilers supply boilers with a probe-type LWCO, but a float type can be specified at no additional charge.
In the old days, steam boilers held large quantities of water and water didn’t fluctuate as much as it does in new, low-mass boilers, so float-type LWCOs were the norm. With new boilers and small water quantities, probe-type LWCOs have become the norm, and the models for steam boilers have time delays built in, allowing for water fluctuations.
LWCOs can also be used in conjunction with automatic water feeders. Everyone has his or her own preference; let me tell you mine and you decide from there.
First, I never use an automatic feeder on a residential job. If a system is working correctly, it should need water once a week; if it needs it more, find out where it’s losing the water and repair the leak.
I’ve seen lots of steam boilers rot out prematurely because someone added an automatic feeder to a system with leaking air valves. Water is made of hydrogen and oxygen; add too much and the boiler starts to rot from the inside out.
Another problem with automatic feeders is that they only bring the water to a safe operating level. There is a misconception that by adding a feeder you’re making it an automatic system; however, you still need to add water to get to the proper operating level. I like to get the customer down to the basement once a week to check the boiler. With no automatic feeder, we can accomplish this.
As far as what type of LWCO to use, I prefer a float type. They have nice, big, blow-down valves so when the customer is in the basement checking the water level once a week, s/he can flush the dirt out of them.
Probe-type LWCOs came about as the boilers got smaller. Seems that as the water started boiling, it made the float jump up and down, and as that was happening, the boiler turned on and off, and if there was an automatic feeder, it flooded the boiler.
Along came the probe-type LWCOs with a time delay. When the water surges, the boiler doesn’t shut off immediately; if it’s a quick surge, the boiler will keep running until the water level stabilizes. The only problem I find with this is that the boiler water shouldn’t be surging to the point that it’s affecting the float in an LWCO. Oil and dirt cause water surging.
If you read the installation instructions that come with a new boiler (that’s the book you kneel on when you light the pilot so you don’t get your pants dirty), there is a whole section dedicated to cleaning a boiler before you place it into operation. Properly cleaning a boiler should take 4 to 6 hrs. You can do this two ways:
1. Figure it into your price and spend 4 to 6 hrs; when the boiler is placed into operation, you leave it running properly, nice and quiet, no banging and surging.
2. Make six 1-hr service calls to an irate customer who was up all night listening to his boiler, which sounded like someone was beating pipes with a hammer. The six 1-hr trips do not include traveling six times, so after doing the math I think you will find that cleaning it once and doing it thoroughly is the way to go. I used to like to let the boiler run a day or two, then I would go back and give the system a thorough cleaning.
Another problem I ran into with probe-type LWCOs is foaming. Remember I said that probe-type LWCOs use the water in the boiler to close a circuit? Well, if you didn’t clean the boiler water according to the manufacturer’s instructions, instead of water, you can have foam in the boiler. Oil and dirt are in the water and as it boils, it sends the water rushing into the steam pipes; what’s left in the boiler foams up and the boiler thinks it has water and keeps running. This usually leads to a cracked boiler.
The moral to this story: No matter what kind of LWCO you use, clean the boiler or get the homeowner to clean it. Personally I like float types, but either LWCO works if the boiler water is clean.

BRING ON THE CONTROLS
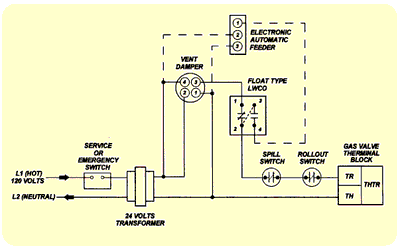
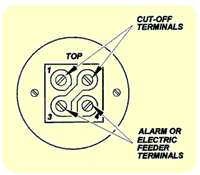
Let’s add our controls. All we do is add the LWCO and the pressure control to the circuit in series.The first wiring diagram (Figure 7) is of a boiler with a float-type LWCO. A float-type LWCO has a three-position switch (Figure 8).
When the boiler has enough water, the circuit between terminals 1 and 2 is closed, and the circuit between terminals 3 and 4 is open. When the boiler water level drops, the circuit between terminals 1 and 2 is closed, and the circuit between terminals 3 and 4 is also closed. This allows the boiler to run while the feeder is adding water to the system.
The third case is when there is an excessive drop in the boiler water. The circuit between terminals 1 and 2 is now open, and the circuit between terminals 3 and 4 is also in the open position.
Look closely at that switch. See the slot for the jumper between terminals 2 and 3? This is how we power the feeder. What this three-position switch is doing is acting as a safety device. If the boiler needs water because of normal water loss, it adds water, but if there is an unusual amount of water lost (say, from a broken return), it will shut the boiler and not power the feeder. This eliminates the chance of flooding if there is a broken return or a cracked boiler.
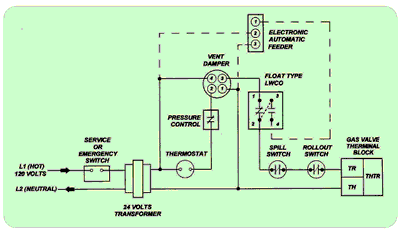
Probe-type LWCOs get wired a little differently. The terminals are usually marked 1, 2, 3, 4, and 5, or, in some cases, 1, 2, P1, P2, and A. Probe-type LWCOs need 24 V supplied to them to make them work, usually through terminals 1 and 2. Terminals 3 and 5 (or P1 and P2 ) get wired in series with the safety circuit. Terminal 4 (or A) is the alarm and/or feeder circuit. Figure 7 shows the boiler wired with a float-type LWCO. The dotted lines are for the optional, strongly not recommended automatic feeder. Now let’s look at the same boiler with a probe-type LWCO and dotted lines showing the feeder (Figure 9).

THE PRESSURE CONTROL
The next control is the pressure control. The pressure control is a switch that, when working as a high-limit safety, opens on pressure rise. The switch can be either a micro switch or a mercury switch. The pressure control is wired in series with the LWCO, the rollout switch, and the spill switch.
There are a few things to remember about pressure controls. First, the cut-out pressure should never be set higher than 2 psi. This is plenty of pressure for most residential one-pipe gravity systems. Higher pressures are inviting problems.
When setting the cut-out pressure of a pressure control, there are two types of pressure controls that you will encounter:
1. The additive pressure control has two settings. One is the cut-in pressure, which is visible on the outside of the control; the second setting is the differential, and it has a wheel found on the inside of the control with numbers from 1 to 6. To determine the cut-out pressure, you add the cut-in setting plus the differential. Set the cut-in at 0.5 psi and the differential at 1.5 to 2, and you will usually have a smooth, quiet boiler.
2. The subtractive pressure control shows the cut-out on the outside and the differential on the inside. Subtract the differential from the cut-out to determine the cut-in pressure.
One other thing I want to mention is the proper way to pipe in a pressure control. A pressure control should be installed into a boiler tapping using a pigtail fitting, which is designed to keep water out of the pressure control. It should be made of brass.
A pigtail fitting should be installed so that when it expands and contracts during temperature change, it will not affect operation of the pressure control. If a pigtail is installed incorrectly, and it is the mercury bulb type, expansion and contraction can alter the pressure as much as 2 psi. Micro-switch controls will not be affected, but it is always good practice to follow proper installation procedures.

FINALLY, THE T-STAT
The room thermostat senses room temperature and opens and closes a circuit as necessary. It is wired in series with the safety controls to control the flow of gas. Figure 10 shows our steam boiler with the thermostat and pressure control installed.There are many types of thermostats on the market today. All low-voltage thermostats have heat anticipators built in. This device allows the thermostat to allow for the heat generated by the wires in the thermostat.
Please read and follow the manufacturer’s instructions for setting and adjusting heat anticipators.

FORCED-AIR FURNACES
On a forced-air furnace, the flue damper, spill switch, and rollout switch will be the same as the steam boiler. The operating control is a combination fan and limit switch. This switch has two separate circuits built into it:1.The normally closed switch will be used as the limit control to turn off the gas supply when the temperature in the heat exchanger reaches a set limit.2.The normally opened switch is used to operate the fan. The normally opened circuit will not allow the fan to run until there is sufficient heat in the heat exchanger, stopping the flow of cold air through the ducts. This switch has a heat sensor (usually a bi-metal) that is placed into the heat exchanger. When replacing a defective unit, please replace it with a control with the same-length sensor. The switches can be wired for line or low voltage. The fan side will always be line voltage since the fan motor is 120 V. I prefer to wire the limit side for 120 V and feed the hot wire on the line side of the transformer from it. Figure 11 shows fan limit switch wiring. Once the transformer is wired, the next step is to bring 24 V to the gas valve. We do this from the load side of the transformer, through the vent damper, spill switch, and the rollout switch. We also add a thermostat in series to sense room temperature. Figure 12 shows a hot air system wiring schematic.
HOT WATER SYSTEMS
Hot water systems are used mostly in the Northeast. They are very versatile, and can be used to economically zone different parts of a building.As with the steam boiler and hot air furnace, these systems also have a flue damper, spill switch, and rollout switch. We are going to discuss a forced hot water system, meaning that there is a pump to circulate the water in the system.
Most package boilers come with a combination aquastat/circulator relay control; 120 V is brought into the control to terminals L1 and L2. The thermostat is brought to terminals T1 and T2, the circulator is connected to terminals C1 and C2, and terminals B1 and B2 power the gas valve.
When the thermostat calls for heat, it closes terminals T1 and T2. The relay sends 24 V to terminals B1 and B2, and 120 V to terminals C1 and C2. The aquastat in the control operates terminals B1 and B2. If the water temperature reaches the aquastat setting, the circuit to terminals B1 and B2 opens, shutting the flow of gas. The circuit to terminals C1 and C2 will remain closed, allowing the circulator to run, as long as the thermostat is calling for heat. Figure 13 shows a wiring schematic of a single-zone hot water heating system, using a combination aquastat-circulator relay control.
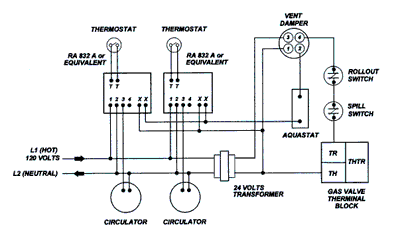
If the boiler did not come with a combination control, you could wire the boiler using a transformer to run the 24-V circuit and a switching relay to run the 120-V circuit. The relay would need an auxiliary dry contact; usually terminals marked X X close the low-voltage circuit.
The thermostat would go to terminals T1 and T2; 120 V would be brought into terminals 1 and 2. Terminal 1 would be the hot terminal and terminal 2 would be the neutral. The circulator would go to terminals 2 and 3, with the neutral going to terminal 2 and the hot to terminal 3. Terminals X and X would go through a 24-V circuit consisting of an aquastat, flue damper, spill switch, rollout switch, and gas valve.
Here’s how this system works. When the thermostat call for heat, it closes terminals T and T. A relay closes, sending power to terminal 3 and 4. Terminals X and X also close. This closes the low-voltage circuit, allowing gas to flow. The aquastat will open the 24-V circuit when the water reaches temperature, stopping the flow of gas. The circulator will run until the thermostat is satisfied.
ZONING
If there is more than one zone and you are using circulators to run each zone, you use one relay for each zone. The thermostat for each zone would go to a separate relay with the thermostat for the corresponding zone connected to terminals 3 and 4. The X and X terminals from all the relays would be connected in a parallel, 24-V circuit consisting of an aquastat, flue damper, spill switch, rollout switch, and gas valve.Any separate zone would turn on its own circulator and also turn on the boiler. If the boiler reaches temperature limit, the boiler would turn off, but the circulator would keep running until the thermostat is satisfied.
Another way to wire multiple zones is with the use of a multi-zone control (see Figure 14). These controls have features that make the use of separate relays for each zone obsolete. You can order controls that have a priority zone on them. This is great if you are using a storage tank for domestic water and need a priority control.
There are also controls that can work in conjunction with an outdoor reset control. This is a great value-added item: “Yes Mr. Jones, everybody is giving you the same boiler, but I have this control that will save you money.” That’s usually when customers’ eyes light up.
Best of all, these controls are easy to wire. You supply 120 V to the controls, bring the thermostat wires to the corresponding circulators, wire the dry contacts through the high limit and safety controls, and you’re done. Nice, neat clean, fast and economical; you can’t ask for more than that.
One other way to wire multiple zones is with the use of zone valves. A zone valve is a motorized solenoid valve with an end switch. The thermostat for each zone is wired through a 24-V transformer to the zone valve. A mechanical end switch is wired to the thermostat terminals of the boiler operating controls.
When choosing a transformer for zone valves, make sure that the VA (volt amps) rating of the transformer is sufficient to run the zone valves attached to it. The way to determine VA is to multiply the volts of the transformer, in this case 24, by the amp rating of the zone valve.
By adding up the VA in a load, we can determine how many zones a transformer can carry. Zone valves have an intermittent draw, so even though the total of three zone valves is more than the 40-VA rating of the transformer, three zone valves can be used with one 40-VA transformer.
Zone valves can be either three- or four-wire models. When installing zone valves, always follow the manufacturer’s instructions for wiring. If you’re replacing one brand with another, always check the amp rating of new valve and replace or add transformers as necessary.
This article was excerpted from “The Complete Guide to Residential Gas Heating” by Richard Bruno, an instructor in Nassau County BOCES, Nassau County, NY, and at the Suffolk County BOCES, Suffolk County, NY. Among his professional affiliations, he is a member of the National Old Timers Association of the Oil Heat Industry, and a Long Island Lighting Co. Contractor Advisory Committee Member. He can be reached at 718-668-0180.
Publication date: 10/23/2000

Report Abusive Comment