ACHR News
search
Ask ACHR NEWS AI
cart
facebook twitter instagram linkedin youtube
  • Sign In
  • Subscribe
  • Sign Out
  • My Account
ACHR News
  • NEWS
    • Breaking News
    • New HVAC Products
    • Featured Products
    • Manufacturer Reports
    • HVAC Data
    • Legislation
    • ACHR NEWS Centennial
  • RESIDENTIAL
    • Air Conditioners
    • Furnaces
    • Residential Heat Pumps
    • Ductless
    • Residential IAQ
    • Testing, Monitoring, Tools
    • Components & Accessories
  • COMMERCIAL
    • Air Handlers
    • Rooftop Units
    • Chillers and Cooling Towers
    • Commercial Heat Pumps
    • Boilers and Hydronics
    • VRF/Ductless
    • Commercial IAQ
  • REFRIGERATION
    • Refrigerants
    • Refrigerant Regulations
    • Leak Management
  • CONTRACTOR PRO
    • Geothermal
    • Homeowner Study
    • VRF and VRV Ductless
    • Unitary Trends
  • EDUCATION
    • Training and Education
    • Business Management
    • Service and Maintenance
    • Continuing Education
    • Market Research >
      • HVAC Brand Awareness Report
      • VRV, VRF, VRVZ Report
      • Unitary Trends Report
      • Water Heat Professionals Report
    • Webinars
    • Sponsor Insights
    • eProducts Info
    • White Papers
  • EVENTS
    • HVAC Contractor Forum
    • Industry Events and Webinars
  • MEDIA
    • Videos
    • AHR Expo 2025 Videos
    • Podcasts >
      • ACHR News Podcast
      • HARDI Podcasts
      • AHR Expo Podcasts
      • ACCA Podcasts
    • Interactive Spotlights
    • Quizzes
    • eBooks
    • HVAC Talkback
  • HVAC GROUP
    • ACHR NEWS >
      • Current Issue
      • Digital Edition
      • Subscribe
    • Distribution Trends
    • SNIPS NEWS >
      • Join SNIPS NEWS
    • Engineered Systems News >
      • Join ES News
    • HVACR Directory
    • Contests
    • Newsletters
    • Contact
    • Advertise
    • My Account

Step-By-Step Procedures At The Heat Pump Job

May 20, 2005
The right tools are a necessity for any service tech working on heat pumps, but following proper procedures during an installation is critical. Here are the specifics.

At The Jobsite

8:00 a.m. - You arrive at the job. The unit is piped, electrical is connected, low voltage is wired, and the system is charged with nitrogen. The unit is a 2.5-ton, 13-SEER, R-22 model with a matched air handler/evaporator coil. (You will find out what type of metering device is used when you go inside the house.) The system is a new installation; the heat pump was installed in the home yesterday, and a charge of dry nitrogen was left as a holding pressure in the system.

The electric furnace has been in operation overnight. Operation of the electric elements was verified yesterday on the initial air handler startup, and it's time to start the cooling. (It's early spring - welcome to Ohio.)

8:10 a.m. - You have notified the customer that you have arrived, explained what you will be checking, and you pet the family dog.

The new unit is a 2.5-ton, 13-SEER, R-22 model with a matched air handler/evaporator coil.
8:15 a.m. - It's 62 degrees F outdoors, 71 degrees indoors. You have carried the following tools from the truck around to the back of the house: a micron gauge, vacuum pump, volt ohmmeter, and your billing book with an attached check sheet. In your pocket are your digital manometer and humidity stick. Hand tools consist of an adjustable wrench, a four-in-one screwdriver, and a battery drill with a 1/4-inch twist drill and 1/4- and 5/16-inch hex head adapters.

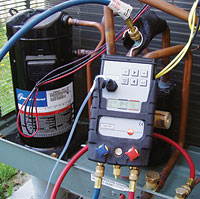
8:17 a.m. - Digital gauges are attached; you left them on overnight tucked into the unit, as it was too late to start the cooling after installing the equipment. The disconnect is in, and 230-V power is applied to the condensing unit (it has been powered overnight). The low-voltage connection is run, but it is not connected to avoid unintentional startup by the customer.

Temperature probe is attached to the suction line, the system is still under pressure, and pressure is verified at 150 psi. Based on the temperature-compensated pressure test done with the analyzer, there are no leaks.

8:19 a.m. - You blow the nitrogen out, attach the vacuum pump, open the ballast on the pump, and start the evacuation. You check the level of oil in the pump. On your check sheet, you jot down the model and serial numbers of the condensing unit and verify the tonnage and type of refrigerant. Then you go inside.

Steps include taking pressure and saturation measurements at the unit.
8:22 a.m. - At the front door, you put on those cute blue booties (it's been two years and you haven't quite gotten the hang of those darn things yet) and proceed to lower the thermostat setting exactly 10 degrees.

8:30 a.m. - Down in the basement you go. The evaporator fan is running. You shut off the furnace and pull the blower door. The filter looks OK. The motor is a ECM variable-type blower motor. You hand rotate the blower, check the bearings, and make sure the set screw on the hub is tight. You jot down the furnace/air handler model and serial number.

8:35 a.m. - You check the model and serial number of the cased coil and verify that it is matched to the system. Not being familiar with the model number, you have to pull the access door to verify the type of metering device in the system - a thermostatic expansion valve (TXV).

Looking for quick answers on air conditioning, heating and refrigeration topics? Try Ask ACHR NEWS, our new smart AI search tool. Ask ACHR NEWS →

8:42 a.m. - With the door off (to make sure you don't drill through the coil or the drain pan), you drill a 1/4-inch hole below the air handler just below the cased coil cabinet and another in the supply plenum to measure the total external static pressure drop through the air handler. The doors, coil, and blower then get reinstalled.

The disconnect is in, and 230-V power is applied to the condensing unit.
You close the bypass on the humidifier. Installing the manometer (+) side at the furnace, and (-) at the coil, you measure the pressure drop. It is 0.030 inches water column (wc). The dipswitch settings are on low. From the chart, that means the coil has approximately 982 cfm airflow across it. The unit is rated at 2.5 tons, and the cooling capacity required is 1,125 cfm, based on a nominal 450 cfm/ton. (This would be 400 cfm/ton if straight cooling.) You rest the dipswitches for (high) 450-cfm/ton capacity and recheck the airflow (0.385 inches wc). This means the fan is moving 1,170 cfm from the chart. Good.

You record the required and actual airflow on the sheet. The manometer is removed and the holes are plugged with Thumb-Gum® and the airflow is set. The air handler is then shut off.

9:00 a.m. - (Yes, a proper startup will take more than an hour, but you won't be back for the no-charge warranty call.) Back out at the condenser, the unit is down to 1,000 microns. You close the gas ballast and let the pump continue to run. You pull the disconnect and remove the access panel. Gently tugging on the electrical connections, all appears OK. You verify the wire size and fuses and connect the low voltage. The disconnect is left removed.

9:10 a.m. - You head back inside and don the booties again. Back down in the basement, you turn back on the power to the furnace and measure the conditions of the return air in the cold air drop. The entering (return air) wet bulb and dry bulb are recorded. You then move the humidity stick to the supply air duct a few feet from the coil. You leave the furnace running.

R-22 is added to the system. The subcooling drops to 7.5 degrees F. It is within the manufacturer’s guidelines.
9:20 a.m. - Back outside, the micron gauge is down to 450 microns; you valve off the pump and the reading rises slightly, then levels off. Over a 10-minute period, the system holds below 500 microns.

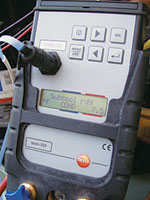
9:32 a.m. - You isolate the micron gauge, remove the service valve caps, and cut in the charge. Knowing that this is a TXV-type metering device, you move the temperature probe to the liquid line to charge by subcooling. You set the digital manifold up to log every 20 seconds, push in the disconnect, and the system starts. The low side starts to come down, the high side goes up, and the system starts to cool.

While the system is settling out, you take the electrical measurements, volts and amps, and start taking some of the tools back to the truck.

9:40 a.m. - The system has settled out, the subcooling is running at 2 degrees, the manufacturer's chart calls for 7 degrees - the system is slightly undercharged. You head back to the truck for an R-22 tank and a scale.

9:45 a.m. - You slowly add refrigerant to the low side of the system allowing time for the charge to settle as you watch the subcooling on the analyzer. Eventually you add 9 ounces of R-22 to the system. Watching the digital manifold set, the subcooling soon drops to 7.5 degrees. It is within the manufacturer's guidelines, so you leave it. You record the refrigerant in the refrigerant log in your billing book.

Figure 1. The cfm and entering and leaving air conditions are entered into the psychrometric program.
9:52 a.m. - Back in the basement (booties again), the "as left" wet bulb and dry bulb are recorded. The holes in the ductwork are sealed with Thumb-Gum and you scan the basement for loose tools. The condensate trap has filled and water is going down the drain. On a hanging tag, you jot down the pressure drop across the coil for future reference, the actual cfm, and date and sign the tag.

9:55 a.m. - The cooling is done!

9:57 a.m. - It's a heat pump, so we need to verify the operation in heating. The thermostat is switched from cool to heat and the unit is given time to settle. The temperature rise across the indoor coil is verified. And the operating pressures are compared to the heating charging curves on the compressor access panel. Almost all manufacturers recommend the final system operation is verified in the cooling mode, so the charge should not be adjusted.

10:15 a.m. - You stop the logging process, remove the gauge set, make sure the caps are installed on the Schrader ports, disconnect the power, and reinstall the access panel. Then you reinstall the disconnect. You make sure that all the paperwork is complete, and carry the rest of your tools back to the truck.

10:30 a.m. - You have explained the system's operation to the homeowner, moved the thermostat back to its original settings, and get your paperwork signed. It's time to call in for the next customer.

Figure 2. A report detailing the latent, sensible, and total Btuh capacity of the unit is generated.

Back At The Office

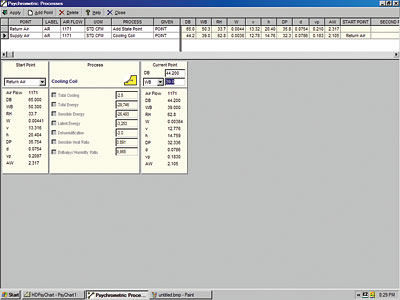
The information from the manifold set is downloaded into the computer. The service manager verifies correct operation by viewing a graph of the system operation. The cfm and entering and leaving air conditions are entered into the psychrometric program; a report detailing the latent, sensible, and total Btuh capacity of the unit is generated.

The system is operating as designed. A copy of the report is filed, sent to the homeowner, and the true operating conditions that were logged are sent in for third-party verification.

Did it take any longer? With the time you saved using digital instrumentation, most likely not. The airflow and charge were checked in a matter of minutes. The charge verification was done with tamperproof equipment data, the airflow can be verified by the equipment design, and the data recorded by the digital manifold set.

Always compare your measurements against the manufacturer’s requirements.
The entering and leaving air conditions were measured to one-tenth of a degree. The accuracy of the performance check is unparalleled.

What is your time really worth? If you do it right the first time, you will not be back out again until next year for spring service.

Do it right. Do it once. Work smarter, not harder.

Jim Bergmann teaches at Cuyahoga Valley Career Center, Brecksville, Ohio.

Publication date: 05/23/2005

Share This Story

Looking for a reprint of this article?
From high-res PDFs to custom plaques, order your copy today!


Recommended Content

JOIN TODAY
To unlock your recommendations.

Already have an account? Sign In

  • HVAC-enrollment

    The Trades Are Back: HVACR Programs See Nearly 30% Enrollment Spike

    A new wave of future technicians is entering the pipeline.  
    News
    By: Matt Jachman
  • 2025 Top 40 Under 40

    2025 Top 40 Under 40 HVACR Professionals List

    The 11th annual Top 40 Under 40 list highlights those...
    HVAC Contracting
    By: Hannah Belloli-Oster
  • LG Ductless Mini-Split Systems

    The 9 Types of Heat Pumps

    As the U.S. moves toward electrification, heat pumps are...
    Ground Source Heat Pumps
    By: Joanna R. Turpin
Subscription Center
  • Create an Account
  • Start a Subscription
  • Manage My Account
  • Sign Up for Newsletters
  • Visit Customer Service
  • Update Preferences

More Videos

Sponsored Content

Sponsored Content is a special paid section where industry companies provide high quality, objective, non-commercial content around topics of interest to The News audience. All Sponsored Content is supplied by the advertising company and any opinions expressed in this article are those of the author and not necessarily reflect the views of The News or its parent company, BNP Media. Interested in participating in our Sponsored Content section? Contact your local rep!

close
  • Piggy Bank
    Sponsored byWatercress Financial

    Energy Prices, Inflation, and HVAC: What Today’s Homeowners Care About

  • Refrigerated Food
    Sponsored bySolstice Advanced Materials

    R-455A Refrigeration: A Cold Storage Solution for the Future

  • Airex Rooftop Units
    Sponsored byAirex Manufacturing Inc

    Consolidating Roof Penetrations: A Growing Trend in Multifamily HVAC Design

Popular Stories

HVAC-Price-Increase-graphic

HVAC Price Increase List: June 2026

Trump-Section-232.jpg

Trump Reduces Section 232 Tariffs on HVAC Equipment to 15%

R410A-Refrigerant-Cylinder.jpg

Refrigerant Recovery is a Revenue Opportunity

Heat-pump-cutaway.jpg

PFAS Rules and A2L Building Codes Continue to Evolve

Kroger.jpg

Kroger to Spend $100 Million to Reduce Refrigerant Leaks

View The ACHR NEWS
Centennial Anniversary Timeline

The ACHR News Timeline Chart
Submit a Letter
Submit a letter to our editors.

Events

November 6, 2025

Next-Gen Data Center Cooling: HVAC Innovation and Real-World Solutions

On Demand As AI workloads and high-density computing push traditional cooling methods to their limits, the data center industry is accelerating the adoption of next-generation HVAC technologies.

June 9, 2026

Before You Go All In on AI: Set Up Your Business to Actually Win

In this webinar, we'll walk you through exactly what to get in place before you add AI to your business. You'll leave with a clear picture of where you stand today and a practical action plan to set yourself up for real results.

View All Submit An Event

Poll

Summer Staff

Are you fully staffed for the summer season?
View Results Poll Archive

Products

BNI Mechanical/Electrical Square Foot Costbook, 2026 Edition

BNI Mechanical/Electrical Square Foot Costbook, 2026 Edition

See More Products
A2L Refrigerants - Free Webinar - May 21, 2026

Related Articles

  • heat pump defrost

    Troubleshooting the Heat Pump Defrost Cycle: A Step-By-Step Guide

    See More
  • panel-photo.jpg

    A Field Report From the Heat Pump Front Lines

    See More
  • Distributors Discuss the Heat Pump Market

    See More

Related Products

See More Products
  • Uncomplicating The Heat Pump: Refrigeration & Air Flow Systems DVD

  • Uncomplicating The Heat Pump: Electrical System Troubleshooting DVD

  • A-Heat-Pump-Thats-Not-Delivering-Any-Air-DVD-Cover-218x300.jpg

    A Heat Pump That’s Not Delivering Any Air

See More Products

Related Directories

  • BP Porter Inc. (Heat Pump Controls/Thermostats)

    BP Porter Inc., the products of this company BPC-1 Bill Porter Control (a fossil fuel control) and BPC-ODS micro'stat was developed (invented) by Bill Porter, an HVAC technician in early 1994.
  • IGSHPA-International Ground Source Heat Pump Assn.

    IGSHPA is an association of companies, professionals and users dedicated to promoting the science, utility and use of geothermal (ground source) heating and cooling technology.
  • First Step USA Inc DBA Beenimax

    Beenimax supplies dependable HVAC parts and accessories, delivering fast shipping, competitive prices, and quality solutions for heating, cooling, and refrigeration professionals nationwide.
×

Sign Up. Stay Informed.

The #1 trusted source for the HVACR industry since 1926

SUBSCRIBE
  • RESOURCES
    • Advertise
    • Contact Us
    • Advisory Board
    • Classifieds
    • Submit a Letter
    • Directories
    • Store
  • ACCOUNT CENTER
    • Create an Account
    • Start a Subscription
    • Manage My Account
    • Sign Up for Newsletters
    • Visit Customer Service
    • Update Preferences
  • SERVICES
    • Marketing Services
    • Reprints
    • Market Research
    • List Rental
    • Survey/Respondent Access
  • STAY CONNECTED
    • LinkedIn
    • Facebook
    • Instagram
    • YouTube
    • X (Twitter)
  • PRIVACY
    • PRIVACY POLICY
    • TERMS & CONDITIONS
    • DO NOT SELL MY PERSONAL INFORMATION
    • PRIVACY REQUEST
    • ACCESSIBILITY

Copyright ©2026. All Rights Reserved BNP Media, Inc. and BNP Media II, LLC.

Design, CMS, Hosting & Web Development :: ePublishing