Internal flushing is critical for coils
Burnouts cause moisture, acid, soot, and hard-core carbon deposits to contaminate the condenser and evaporator and clog the filter-drier. Contaminants may also enter the compressor itself and cause irreparable damage.
If these contaminants are not completely removed from the system, you run the risk of repeated compressor burnout and failures.
Then and now
Years ago the solution was easy.After a compressor burnout, a service technician would clean the interior compressor coils by spraying liquid R-11 (which was inexpensive, easy to use, and legal to vent into the atmosphere) directly into the interior of the condenser and evaporator coils. The refrigerant would flush out the contaminants and then evaporate, leaving the coils clean, residue-free, and ready for use.
This cleaning process is no longer legal. In addition to having phased out the production of CFC refrigerants, the Montreal Protocol prohibits the use of liquid refrigerants such as R-11 or -12 as a solvent and cleaner when vented into the atmosphere.
Although you can still obtain select CFCs, they are expensive, highly regulated, and users can be fined heavily if these products are misused.
Since the use of CFCs is impractical and HFCs are ineffective for coil cleaning, using an internal coil-flushing agent is the alternative.
Some coil flush chemicals have been designed for specific applications, such as automotive a/c systems. Others encompass a broader range of applications.
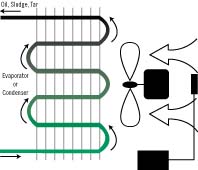
Interior flushing
Chemical flushing agents are specifically designed to flush the interior coil lines after a compressor burnout or for retrofit applications.Since these are non-pressurized liquids, the technician must purchase a pumping device such as a motorized chemical-acid-oil pump to circulate this chemical throughout the system. A hand oil pump can be used on small applications, such as domestic refrigerators or vending machines, to move the flushing agent throughout the coils.
Looking for quick answers on air conditioning, heating and refrigeration topics? Try Ask ACHR NEWS, our new smart AI search tool. Ask ACHR NEWS
It is important that the system be broken down into segments (condensing coils separated from the evaporating coils), or that components such as the drier, accumulator, receiver, expansion valve, or capillary tube be bypassed to allow unrestricted flow and non-trapping of the chemical at any point in the system.
In order to completely dissolve oil, carbon, and tar deposits, it is necessary to completely fill the coils with the interior coil flush. The flushing period should be no less than 20 to 30 min.
Benefits of flushing
There are many benefits to using a chemical coil flush.- The circulation of the coil flush loosens and dissolves the hard carbon deposits left after a compressor burnout. This circulating action also aids in dissolving any mineral oil and acid.
When the coil flush is blown out of the system with dry nitrogen, acid, oil, and carbon are completely removed from the interior coil lines.
- The coil flush method is less time consuming when preparing a system for retrofitting to non-CFC refrigerants and the oils they require.
The chemicals in some brands of coil flush are completely miscible with mineral, polyolester, alkylbenzene, and PAG oils. Circulating these coil flushes can eliminate up to 100% of these oils. (A second flushing may be necessary with some coil-flushing agents currently on the market.)
This process can be done in less than 2 hrs, depending on the size of the system and the type of circulating pump being used.
- A good coil-flushing agent will be compatible with any refrigerant or blend. One manufacturer of coil flush suggests that if the technician leaves a small amount of the coil flush in the system (5% or less of what was originally introduced), no harm will be done to the compressor or any of the integral parts of the system.
- There is evidence to suggest that the cutting oils used in the manufacture of condenser and evaporator coils may lead to capillary tube plugging in R-134a systems. Flushing of these coils at the point of manufacture will rid the coils of any excess cutting oil and production residues, thereby reducing the risk of system contamination and possible capillary tube plugging after the coils have been in use for some time.
- Finally, for the environmentally conscious, consideration should be given to a coil-flushing agent that is environmentally safe. This could be one that has low volatile organic compounds (VOCs), is biodegradable, and CFC free.
Service companies must evaluate which coil-flushing agents will accomplish the task without compromising employees’ or customers’ health.
Pump considerations
While most chemical pumps do an adequate job of moving the coil flush throughout the system, the seal and diaphragm materials that come in direct contact with the coil flush must be considered.Seal and diaphragm materials such as neoprene, santoprene, nitrile, and polypropylene have a limited compatibility with some coil-flushing agents. Swelling or deterioration may occur that could cause pump failure, and/or leaks, and/or requiring the replacement of the impeller, diaphragm, O-rings, or valves.
Pumps manufactured with Viton® or Teflon® appear to be the most resistant to the chemicals that make up the coil-flushing agents.
In summation
The Montreal Protocol Act has certainly made it tougher for the technician to easily and inexpensively address the issue of system clean-up after compressor burnouts and in preparation for retrofitting an existing system.There have been a limited number of products and methods to fully clean and prepare the interior lines in an air conditioning or refrigeration system, particularly after a compressor burnout or in a retrofit application.
Ultimately toxicity, flammability, and VOC levels must be considered from personal and environmental safety standpoints.
The decision of which product to use to clean out your customers’ coils may be difficult, but the decision of whether or not to clean your interior coils is obvious: You must.
For more on this topic, visit www.achrnews.com for a sidebar to this story entitled “The Circulating Pump Method.”
Sidebar: The circulating pump method
There are several methods to clean the interior lines of an evaporator and condenser. In small systems (up to 2 tons), a hand-oil pump can be used to flush the coils. In larger systems, it is recommended to use a circulating pump to move the coil flush through the coils. The movement of the flushing agent quickly breaks down the hard carbon deposits, dissolves the oil and eliminates the acid in the system.1. Recover the entire refrigerant from the system according to the recovery system guidelines and drain all available oil.
2. Disconnect the compressor, drier, accumulator, receiver, and expansion valve or capillary tube from the system.
3. If cleaning the entire system at the same time, connect the tubing where the drier, accumulator, receiver, expansion valve, or capillary tube was taken off-line with vinyl tubing. However, it may be easier if the evaporator and condenser coils are separated from the system and cleaned individually. Always start from the evaporator side, which is considered less contaminated than the condenser.
4. Measure the correct amount of coil flush to fill the coils completely (approximately 1 gal/ton for each coil) and place it in an appropriate-size container. It is important that a notation be made of the exact amount of the coil flush introduced into the coils.
5. Connect a section of vinyl hose from the container to the intake side of the circulating pump and a second section of hose from the outlet side of the pump to the low side of the coil. A third section of hose will be needed to connect the high side of the coil to the container of coil flush. This creates the closed-loop system.
6. Turn the pump on and circulate the coil flush throughout the coils for 20 min or longer.
7. After circulating this chemical throughout the coils, remove the tubing from the pump, and blow the system out with 100 psi of nitrogen, so any remaining coil flush is removed from the system into the original container.
8. Collect the coil flush and measure the amount of coil flush that was returned to the container. Compare this amount to that which was originally introduced into the coils. Do not leave more than 5% of any coil flush in the system. Otherwise, you run the risk of putting too much pumping pressure on the system. Repeat steps 4-7 to clean the condenser coil.
9. Test the system for any oil, acid, or contaminants. Repeat the above steps if necessary and test again. Dispose of the used coil flush according to federal, state, and local guidelines.
10. Clean out the accumulator, receiver, and expansion valve separately.
11. Refit the system with the proper capillary tube/expansion valve and drier according to industry standards. Reconnect a new compressor and all remaining components.
12. Using a vacuum pump and micron gauge, evacuate the system to a minimum of 300 microns in order to remove any coil flush, nitrogen, moisture, or noncondensable. Recharge the system with refrigerant and oil according to the manufacturer's specifications.
13. Start the equipment and make any necessary adjustments.
NOTE: The above procedure is considered as a general guideline only. Please check with the manufacturer of the unit for additional procedures or precautions regarding the use of any of the coil-flushing agents.
Looking for a reprint of this article?
From high-res PDFs to custom plaques, order your copy today!


