Btu Buddy 168: Oil Furnace Burner Malfunction — Part 1
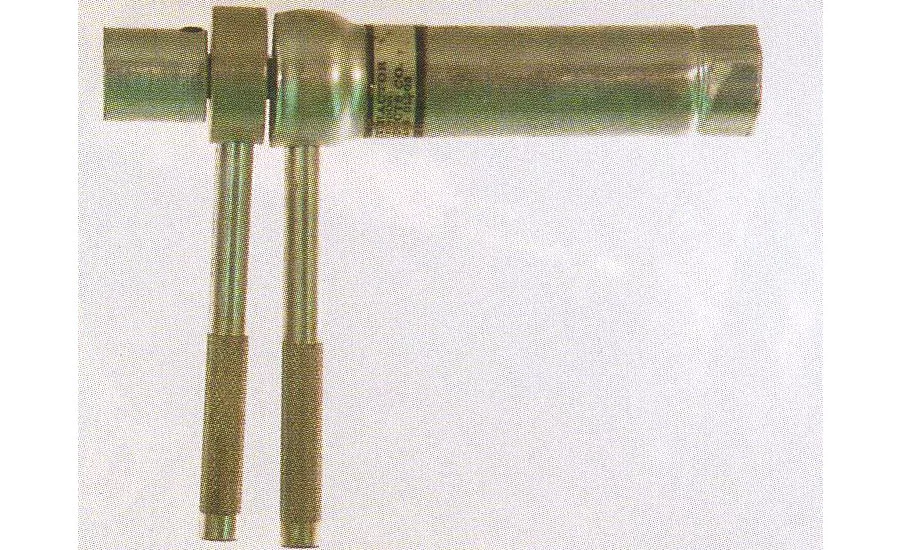
FIGURE 1: This nozzle wrench is a specialized tool that holds the nozzle receiver while turning the nozzle, protecting the nozzle surface. (Figures are from Refrigeration & Air Conditioning Technology, 7th Edition, by William Whitman, William Johnson, John Tomczyk and Eugene Silberstein published by Delmar Cengage Learning.) (©Delmar Cengage Learning.)
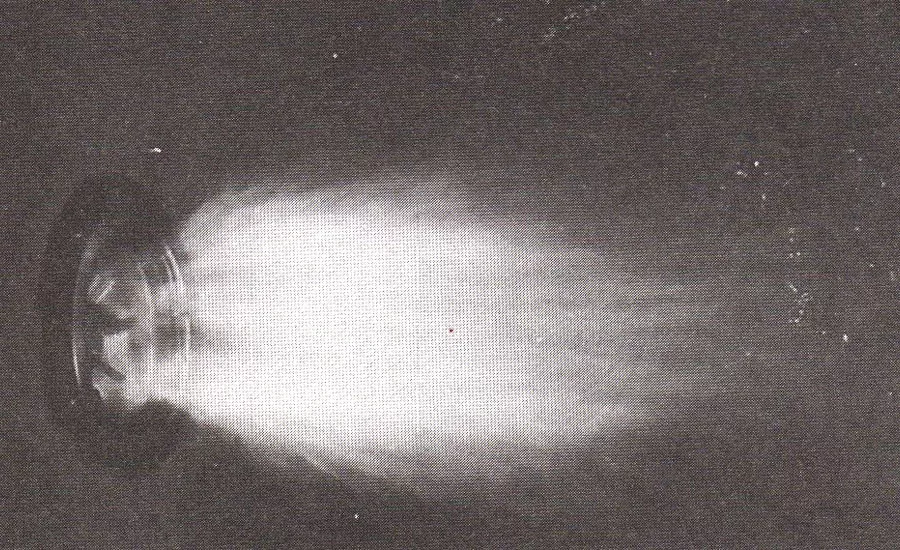
FIGURE 2: This is a photo of an actual flame. Notice the flame shape and that the flame is held close to the burner head. This burner has a flame retention head. Better flame shape control.
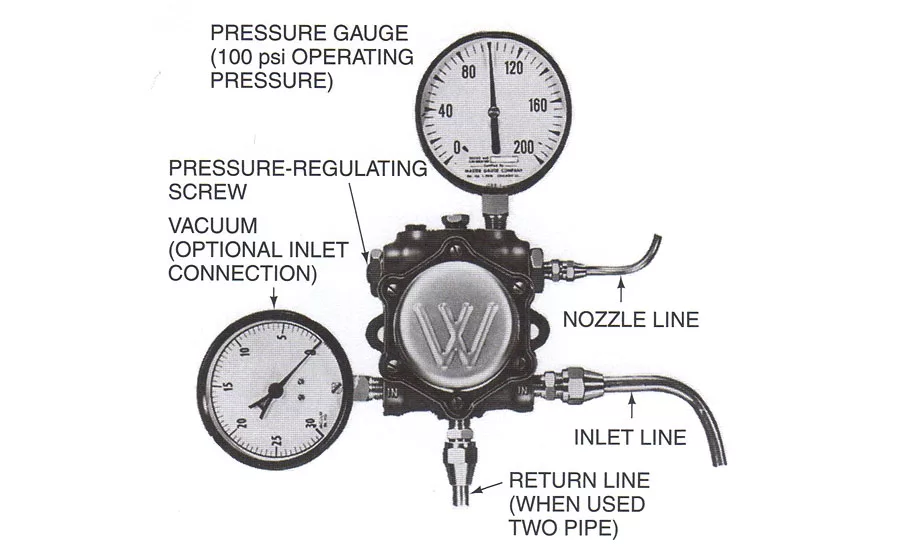
FIGURE 3: These gages show the oil inlet pressure and oil outlet pressure. If the oil tank is below the burner, the inlet pressure can operate in a vacuum. The normal net oil pressure is 100 psig on most residential oil burners.
Bob and Tim have arrived at a customer’s house that uses fuel oil for heat. This is a rural customer who lives away from the natural gas mains, and fuel oil is quite popular for this application where no natural gas is available. Fuel oil is fairly inexpensive compared to propane, which is another choice of fuel for rural customers.
This is a “no heat” call — the customer called first thing this morning and said that the oil furnace was not coming on, and the house was cold. When they arrived, they talked to the customer, and the customer said that he had made several tries to get the furnace to operate but with no luck.
The furnace was located in the garage on the side of the house. Tim and Bob were looking at the furnace and discussing what to do first. Bob suggested they take a flashlight and examine the heat exchanger through the inspection door before they tried to start the furnace. Tim put his light in the opening of the inspection window. He looked in and said, “There seems to be quite a bit of fuel oil in here. The whole chamber is damp.”
“Get some dirty rags and let’s try to blot up any oil or oil film that we see inside the combustion chamber. It is unsafe to start this furnace up with an oil coated combustion chamber,” Bob said.
Tim cleaned up the combustion chamber by wiping it as well as he could, and then they tried to start the furnace. They pushed the reset button and looked through the inspection window to see what combustion looked like, but nothing happened. The burner ran but did not fire. The pump and motor were running, but there was no ignition.
Bob then said, “Take the burner away from the furnace on its pedestal, and set it here on the floor. Then, let’s perform a complete service check on the burner section.”
“What would you like to do?” Tim asked.
Looking for quick answers on air conditioning, heating and refrigeration topics? Try Ask ACHR NEWS, our new smart AI search tool. Ask ACHR NEWS
Bob said, “Get the tray for oil burners out of the truck, and we will go over it step-by-step. Let’s turn the burner away from the furnace and push the button to see what happens when the burner tries to fire.”
“Do you mean we’re going to try to fire the burner in the floor here in the garage?” Tim asked.
“Yes, were going to fire the burner out across the garage floor. The only harm that will come is a little bit of fuel oil could possibly spray, and we can wipe that up. We will get the picture of what the oil spray pattern looks like this way,” Bob said.
They started the furnace and observed what happened. Bob explained to Tim what they saw — “Notice that we got a fairly good spray of oil with a small liquid stream that did not atomize? Fuel oil has to be atomized before it will burn. I also did not notice the electrodes firing while trying to ignite the fuel. So, we know we have to change oil nozzles because of the funny spray pattern. It should’ve been a spray pattern that looks like a blossom coming out the end of the nozzle, not a stream. By coming out in a stream mostly, it would not ignite even if the electrodes were firing.”
“Change the nozzle, putting in an exact replacement. Be sure to use the specialized nozzle wrench for changing the nozzle. It is the best way to keep from damaging the end of the nozzle (Figure 1). Then, set the electrodes using the electrode gauge in the toolbox. Notice that the electrodes themselves never touch the atomized oil stream. The electrodes are fairly wide apart, and the spark that flies between the electrode tips will actually be in the atomized oil stream but will not disturb it because it’s not a solid. It will only ignite the oil,” Bob said.
“Now change the in-line oil filter using the small pan to catch the oil that is standing inside the filter. When you install the new filter cartridge, use that oil to refill the filter can. Add a little bit of extra oil to the can to make sure it’s completely full so there will be little to no air at all,” he added.
They performed all of these duties and had the burner ready to fire. They turned on the furnace and observed what the flame looked like when the burner fired. Tim was amazed because he had never seen an open flame from a gun type burner. They ran the burner for two or three minutes, observing what went on and how a flame looked (Figure 2).
Bob explained to Tim that this was a flame retention burner head and pointed out the fact that the flame was held tightly next to the burner by the flame retention ring built in to it. They were ready to replace the burner into the furnace and fire it when Bob said, “Install gauges on the pump, so that we can see exactly what oil pressure is going to the nozzle (Figure 3).
They reinstalled the burner and were ready to start the furnace.
“Are we going to perform a combustion efficiency test on this furnace?” Tim asked.
Bob said, “Yes, but first we are going to start the furnace and let it run for a while. Remember that residual oil that was in the combustion chamber? We have to let the furnace run long enough to burn that before we do a combustion check. Go ahead and start the furnace. We will make sure that it is running steadily, and we will go to lunch and come back. The house will be warmed by that time, and the furnace will be ready to have a combustion check.”
They started the furnace, and it showed signs of excess oil for a few minutes due to rumbling noises in the combustion chamber. They waited until the furnace settled down running real quiet and went to lunch.
To be continued next month
Publication date: 03/20/2017
Want more HVAC industry news and information? Join The NEWS on Facebook, Twitter, and LinkedIn today!
Looking for a reprint of this article?
From high-res PDFs to custom plaques, order your copy today!


