How to Solder No-Lead Fittings
Contractors need to make sure these 10 things happen
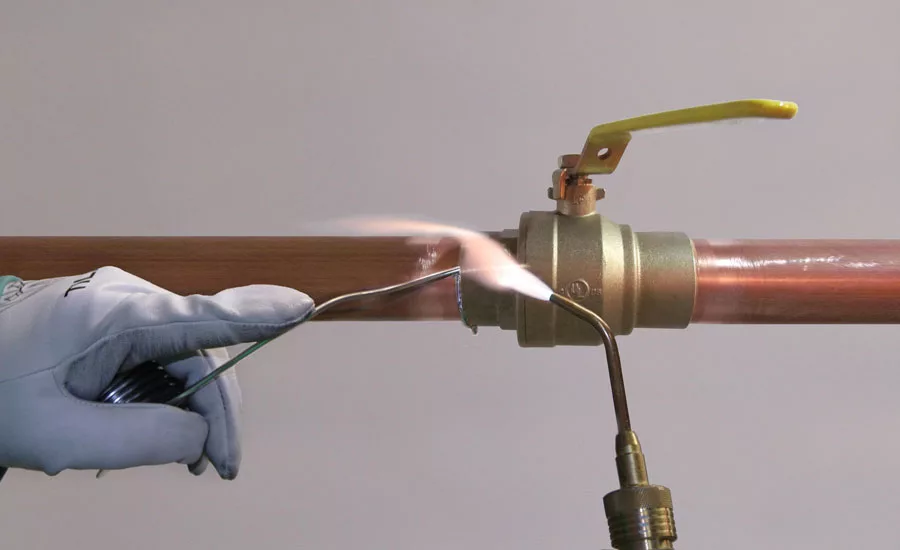
Soldering photo courtesy of the Copper Development Association.
In conjunction with the release of its latest soldering procedure, the Mechanical Contractors Association of America’s (MCAA’s) National Certified Pipe Welding Bureau (NCPWB) encourages contractors to make sure the following 10 things happen when their workers are making soldered joints.
Install and support tubing so that it does not pull on the fittings. This helps to ensure a reasonably uniform gap between the tube and the fitting, which enables capillary flow and filling of the joint with solder. If the tube is cocked even slightly in the fitting, it may become difficult to get good fill.
Use the appropriate flux for the job. When joining copper to copper, any flux advertised as suitable for copper soldering will do. Joining copper to “no-lead” fittings requires flux with ammonium chloride or other chloride salt in it to ensure proper dissolution of the oxides on the no-lead fittings. Check the flux manufacturer’s literature.
Clean and abrade the fitting and tube. It is important to clean the fitting and the tube with solvent (MEK, alcohol, etc.). After cleaning, the surface should be abraded with sandpaper or a Scotch-Brite pad. A wire brush designed for cleaning the inside surface of a solder joint cup is also acceptable for abrading fittings. Once the components have been cleaned, the surfaces to be soldered should not be touched with bare hands or greasy gloves.
Assemble and solder joints as soon as practical after cleaning. This will minimize the formation of oxides on the cleaned surfaces. If it has been more than a few hours since cleaning, lightly re-abrade the surfaces before applying flux and assembling.
Apply the flux and solder the joint. It is important that the joint be soldered within an hour of flux application. Flux begins to act on the copper as soon as it makes contact, and its efficacy is reduced if it sets too long.
Preheat the tube thoroughly. Copper has high thermal conductivity which pulls heat down the tube rapidly. Once the tube is preheated, heat both the fitting and the tube, and then apply the solder. The practice of preheating the tube is especially critical for no-lead fittings since no-lead alloys have very poor thermal conductivity (i.e., if you heat the fitting, the outside surface will be hot enough to melt the solder but the internal surface will be too cold for the solder to draw into the gap.)
Looking for quick answers on air conditioning, heating and refrigeration topics? Try Ask ACHR NEWS, our new smart AI search tool. Ask ACHR NEWS
Use practices that are appropriate for the tube position. For joints where the tube is horizontal, the craftsman should apply solder first at about the 5 o’clock position, working his way clockwise up to the 12 o’clock position. He should then return to the bottom of the pipe at the 6 o’clock position so there is some overlap. Next, he should work his way up counter-clockwise to and just past the 12 o’clock position so that there is some overlap of the previously deposited solder at the top. For joints where the tube is vertical, it does not matter where the craftsman starts, but there should be overlap of previously deposited solder.
Wipe off any excess solder after making a joint. After making a joint, the craftsman should wipe any excess solder off the joint. This creates a neat appearance.
While the joint is still hot, wipe it with a wet rag to remove any flux. Residual flux will cause corrosion in damp environments and should not be left on the tube surface. Wire bushing may also be used. For no-lead fittings, wrap the fitting in a wet rag within 30 seconds of completing the joint to pull the heat out of the fitting. This ensures the joint sets up firmly, which is necessary because the poor thermal conductivity of no-lead fittings causes them to remain molten for longer than a copper-to-copper joint.
If a no-lead fitting turns brown, disassemble the joint and re-solder it. No-lead fittings turn brown if they have been overheated during soldering. This indicates that the flux has been deactivated and that the solder did not flow into the joint properly. In these cases, the joint should be disassembled and re-soldered. The solderer should be retrained to heat the tube first.
Reprinted with permission from the MCAA’s National Certified Pipe Welding Bureau from the MCAA Reporter, December 2015. For more information, visit www.mcaa.org/ncpwb.
Publication date: 11/7/2016
Looking for a reprint of this article?
From high-res PDFs to custom plaques, order your copy today!


