Btu Buddy 7: Changing A Badly Burned Compressor
In this installment of the Btu Buddy series, Bob receives a service call from the dispatcher. A small business with a 5-ton single-phase heat pump has called and there is no cooling. It is 90 degrees F outside and the employees are really getting hot.
Bob arrives at the jobsite and goes in to talk to the manager. The manager tells Bob that the system was working yesterday afternoon. But when she turned the unit on this morning, it never did cool down.
A Preliminary Check
Bob goes to the thermostat and it is set to 73 degrees F, but the temperature indicator shows 80 degrees F. Bob can hear the indoor fan running, so he goes to the closet where the indoor fan is located. All seems to be normal, except the suction line is not cold.He now decides to go on the roof where the outdoor unit is located. Bob leans a ladder against the building and ties it off to the gutter so it will remain steady and not blow down. He then gets his tools and a voltmeter and goes up on the roof. The first thing that he discovers is that the outdoor unit is not running.
He removes the cover to the control panel and can hear the compressor contactor humming, so he knows the thermostat is calling for the compressor to run. This puzzles him for a minute until he remembers that the power supply for the low voltage system is in the indoor unit so this power supply is independent from the outdoor unit. Bob uses his voltmeter and checks the voltage at the line side of the contactor. There is no voltage. He then raises the cover to the breaker panel and checks voltage on the line side of the breaker. There is 234 V showing. He then checks the load side of the breaker and there is no voltage.
Bob starts to reset the breaker and Btu Buddy appears, "Do you think it is a good idea to reset the breaker without a further check?"
Bob explained, "It is probably just a random breaker trip."
Btu Buddy then says, "It is real easy to switch to ohms and check out the circuits."
Looking for quick answers on air conditioning, heating and refrigeration topics? Try Ask ACHR NEWS, our new smart AI search tool. Ask ACHR NEWS
Bob switches the meter to the ohms scale and checks from the load side of the breaker to ground, and there is a dead short. Bob remarks, "That was a good idea. If I had reset the breaker, it may have done more damage."
Btu Buddy notes, "Now, you must figure out what the ground circuit is. It will most likely be the fan or the compressor. It is unlikely that a wire has gone to ground."
Looking For The Grounded Circuit
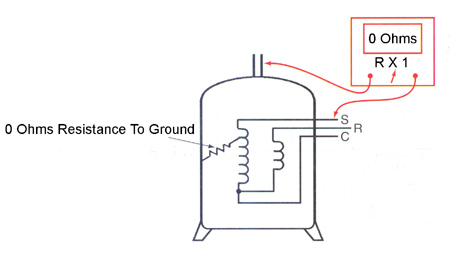
Bob goes to the indoor thermostat and turns it to the "off" position. This takes the low voltage off of the outdoor compressor contactor. The reason that he could check ohms at the load side of the breaker was because the contactor's low voltage coil was energized, making a circuit to the compressor. Bob now places one lead of his meter on a copper line in the condensing unit and the other on the load side of the contactor, and 0 ohms resistance registers on the RX1 ohms scale. He then disconnects the compressor leads and touches one of the meter leads to a compressor terminal and there is 0 ohms resistance. The compressor is grounded (Figure 1).Bob calls the office for a helper and then starts for the truck to get the needed equipment up on the roof, and Btu Buddy says, "Now is a good time to check the crankcase heater. It could be the cause of the motor burn."
Bob asks, "How can that be? A motor burn is an electrical problem and a crankcase heater can only cause a mechanical problem."
"Well," says Btu Buddy, "if the crankcase heater fails, you are right. It will cause a mechanical problem at startup due to liquid slugging, such as ruined valves, thrown rods, and such. Without the crankcase heater, liquid refrigerant will migrate to the compressor crankcase. Most of the refrigerant charge can migrate to the crankcase overnight. Can you visualize a rod being thrown and some of the parts hitting the motor windings and causing a motor burn?"
"Well, yes," says Bob. He reaches down and touches the compressor housing and remarks, "The compressor is hot."
Btu Buddy suggests, "Tape the compressor terminal leads and turn the power on, and see if the crankcase heater is getting hot."
Bob does this and feels the crankcase heater at the base of the compressor and says, "It is not getting hot. The heat in the compressor must have been from the motor ground." Btu Buddy says, "The motor may have burned and then grounded. This would create a hot motor and then a ground."
Bob says, "I don't know what to think now, I'm confused."
Btu Buddy says, "Suppose the compressor started up with a thrown rod that hit the windings and caused the motor to start to cook. There may not be enough amperage to trip a breaker or an overload, but as it cooked, a circuit to ground was created and when that happened, it tripped the breaker. Can you visualize that?"
Bob says, "You really have to think to put the pieces together that make that kind of sense. We are probably classified as service detectives."

Changing The Compressor
Bob and his helper Andy go to the truck and bring up gauges and a recovery machine along with a recovery cylinder. As he connects the gauges to the system, he gets a smell of the refrigerant from the system. "Wow, that refrigerant really stinks," says Bob.Btu Buddy says, "That is a sign that you are dealing with a very bad burn. When a system burns and cooks while it is running, the oil and refrigerant are saturated with the soot from the cooking. A running burn usually blows the soot out the discharge line. A standing burn may throw the contaminants up the suction line. This will require an extra good cleanup procedure."
Bob recovers the refrigerant and makes a list of supplies needed, including:
1. Compressor;
2. Refrigerant;
3. Brazing material and flux;
4. Suction line filter-drier (acid removing type with pressure drop connections), pipe, and elbows to pipe it in; and
5. A compressor contactor, start capacitor, and run capacitor in case they are needed.
Btu Buddy says, "How about the two liquid line driers, extra vacuum pump oil, and nitrogen?"
"You are right," says Bob, "this is a heat pump system and it will require two acid removing filter-driers (Figure 2). When I evacuate the system, the vacuum pump oil will really get dirty and we can use the nitrogen for making the braze connections."
Btu Buddy says, "Many technicians use a bi-flow drier to save time; that is your choice (Figure 3)." He adds, "You can also purge all of the lines with nitrogen to blow any loose soot out from the motor."
Btu Buddy asks, "How will you know if any of this contamination reached into the suction line accumulator and four-way valve?"
Bob says, "I don't know, how?"
Btu Buddy replies, "If we discover a lot of soot in the suction line when you cut it loose, you should assume that soot moved into them also. So it would be a good idea to bring a new accumulator and four-way valve, also."
"Boy, this is a lot to remember," says Bob.
Bob returns with all of the supplies that have been listed and talked about. The system is in a vacuum from the refrigerant recovery.
Btu Buddy suggests, "Bring the system pressure up to atmospheric pressure with nitrogen."
"Why?" asks Bob.
"The nitrogen keeps oxygen from entering the system and prevents oxidation to the piping and parts from the remaining acid that must be in the system," says Btu Buddy.
Bob connects the nitrogen and brings the system to atmospheric pressure.
Btu Buddy recommends, "Let's make a plan for this changeout." The plan is:
1. Get all parts to be used, or that may be used, laid out within easy reach.
2. Cut the compressor suction line loose as close to the compressor as you can, using tubing cutters, not a hacksaw. Examine the condition of the inside of the suction line.
3. Cut the discharge line loose as close to the compressor as you can, again using tubing cutters. Examine the inside of the discharge line.
4. You have gauge lines connected to the liquid line and the gas line outside the unit. Blow nitrogen through the liquid line and see what comes out.
5. Replace the compressor and the four-way valve and accumulator if needed.
6. Install both the liquid line driers.
7. Then install the suction line drier.
8. Pressure test with a small amount of R-22 and nitrogen pressure up to 150 psig.
9. Blow the nitrogen and R-22 from the system.
10. Evacuate to a deep vacuum.
11. Charge and start the system.
12. Check for any other signs that may have caused the motor burn.

Btu Buddy says, "Don't breathe too much of that, it is toxic. Stay upwind."
Bob removes the burr from cutting the suction line loose and takes a white rag and wipes inside the pipe. It comes out oily but clean.
Btu Buddy comments, "Well, I don't believe you will need the new valve and accumulator."
"That's good news for the customer," says Bob.
Bob cuts the discharge line loose and can tell right away that it is full of soot. It is almost closed up.
Btu Buddy says, "That is a sign that the compressor burned while running. Most of the contamination will be confined to the high pressure side of the system. Now blow some nitrogen through the liquid line gauge connection. Place that clean rag over the end of the line to catch debris."
Bob follows his directions and a big glob of oil and soot deposits in the rag. He gives it several blasts of nitrogen until only clear oil droppings come out. Nitrogen is also coming out of the loose suction line. It is clear.
"I think you have the system as clean as you can get it. It is ready for the compressor and then the driers. If you will let the nitrogen trickle through, it will keep the compressor and driers purged and prevent contaminating them with the humidity in the air," says Btu Buddy.
The old compressor is removed and the new one set in place. A short stub of pipe is used to connect the new compressor. This was to keep from having to remove the old braze filler metal from the compressor stubs. The new short length of pipe and a coupling make a much cleaner job.
Bob then solders in the liquid line driers, one for each metering device (Figure 2). Bob then solders the suction line drier into the permanent suction line, between the four-way valve and the compressor. Nitrogen has been trickled all of the time to prevent oxidation inside the system while brazing in the high-temperature connections and to keep atmosphere from entering the system.
Bob then installs the crankcase heater. He checks the compressor contactor and finds the contacts in bad shape after the motor burn, so he changes it. The capacitors all seem to be in good shape so he runs a capacity test on them with his capacitor tester. They are well within range so he doesn't change them.
Evacuating The System
Bob evacuates the system using a four-line gauge manifold. He now has the system at atmospheric pressure with a holding charge of refrigerant in the system. He has turned the refrigerant cylinder to allow liquid into the liquid line and opens the valve to the system. When the liquid stops flowing, he closes the gauge manifold valve to the high side, and starts the system. It is 92 degrees F outside and it is hot inside the office.The suction pressure is running at 156 psig (corresponding to 55 degrees evaporating temperature R-410A) and the discharge pressure is 506 psig (corresponding to 135 degrees condensing temperature). The pressures are about right for an overloaded system and a hot pull down.
Adjusting The Charge
Btu Buddy asks, "How are you going to adjust the charge to make sure that you have the correct charge?" Bob says, "I am going to clean up everything while the building temperature decreases to the normal range, and I am going to charge the system to the proper superheat for a line set of 10 feet." (This procedure was discussed in a previous Btu Buddy article.)The office is beginning to really cool down by the time Bob picks up all of his tools. Bob adjusts the charge by checking the superheat at the outdoor unit until it is about 10 degrees F. He then checks the subcooling of the liquid line and it is 12 degrees F. The pressures are about right for the conditions; the suction pressure is 90 psig (evaporating temperature of 42 degrees F) and the discharge pressure is 332 psig (condensing at 125 degrees F).
Bob reverses the heat pump to heat momentarily to verify that the four-way valve will change over. This is accomplished by jumping from the "R" terminal to the "O" terminal at the outdoor unit. When the valve changes over to heat, he immediately removes the jumper. This system cannot be allowed to run in heat as hot as it is.
Btu Buddy compliments Bob, saying, "You have done a great job of getting this compressor changed in a very reasonable time frame. I like it that you explained your procedures to the customer. That gives the customer confidence in you and your company. When you make the company money and keep the customer happy, you become a valuable employee. It's called craftsmanship. Become a good craftsman and you are a valuable asset everywhere you go."
Bob says, "I wish every technician had a Btu Buddy."
Btu Buddy says, "They do. It is in the texts they studied, the instructors they had, the friends they have in the industry, and the pride they take in their workmanship. Technicians have a Btu Buddy at their disposal. All they have to do is use it."
Bill Johnson has been active in the HVACR industry since the 1950s. He graduated in gas fuel technology and refrigeration from the Southern Technical Institute, a branch of Georgia Tech (now known as Southern Polytechnic Institute). He taught HVAC classes at Coosa Valley Vocational & Technical Institute for four years. He moved on to become service manager for Layne Trane, Charlotte, N.C. He taught for 15 years at Central Piedmont Community College, part of this time as program director. He had his own business for five years doing installation and service work. Now retired, he is the author of Practical Heating Technology and Practical Cooling Technology, and continues as a co-author of Refrigeration & Air Conditioning Technology, 5th Edition, all published by Delmar Publishers. For more information, he can be reached at 704-553-0087, 704-643-3928 (fax), or bmj@myexcel.com.
Publication date: 10/20/2003
Looking for a reprint of this article?
From high-res PDFs to custom plaques, order your copy today!


