One component you can't do without
Once there’s moisture in the system, acid can form, seriously damaging the expensive, more glamorous components. There-fore, it’s important to choose the correct filter-drier for the application, and then size it and install it correctly, if you want to head off problems down the road.

Different desiccants
The filter-drier is placed in the liquid line to filter out all the garbage — including moisture — that can flow through the system (e.g., dirt, metal shavings, etc.). Moisture can be a big problem, because when coupled with high heat and either the chlorine or fluorine component of the refrigerant, acid can be created. That acid can eventually lead to an expensive compressor burnout.A filter-drier may also be placed in the suction line, but it’s important to note that a suction line drier is really designed to be put on as a cleanup tool and then removed once the system is clean. In today’s hectic world, contractors often don’t take the time to come back and take out that drier when the cleanup is finished. If the suction line drier is left in long enough, it may become fully saturated if there’s a lot of moisture present. Then the drier begins to disintegrate, resulting in abrasive materials running through a system.
Big mess. Don’t let it happen.
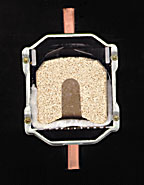
But onto liquid line filter-driers. There are various types of filter-driers, and they differ based on the desiccant that is used. The most popular for high water capacity is the molecular sieve, says Greg Krause, sales and marketing manager, Air Conditioning and Refrigeration Division of Danfoss Inc., Chicago. There may also be filter-driers that are a combination of activated alumina and molecular sieve.
Molecular sieve is manufactured with consistent pore openings large enough to adsorb moisture and acid, but small enough so as not to adsorb larger molecules.
“Activated alumina is a mined material that has varying sizes of pore openings. Picture it as a sponge,” says Krause. “In the activated alumina, the larger pore openings are large enough to accept molecules that are components of the refrigerant, components of the lubricant, that you want in the system.”
When a system uses POE oil, it’s necessary to become aware of just how much activated alumina is in the drier. That’s because the activated alumina can react with the POE oil and create its own acid. Several years ago it was determined that more than 27% or 28% alumina was not good in a POE lubricated system. The blends of cores and the driers have changed to coincide with that, so many manufacturers now offer 80% molecular sieve/20% activated alumina or 100% molecular sieve filter-driers. Both would be compatible with POE.
Looking for quick answers on air conditioning, heating and refrigeration topics? Try Ask ACHR NEWS, our new smart AI search tool. Ask ACHR NEWS

Size and selection
Most filter-driers use a measurement for the size of the bead or the desiccant itself — 3 Angstrom is the most popular. With different refrigerants and lubricants, the attrition rates of the desiccants differ — some of them will break down more easily than others.The various desiccant manufacturers use different designations for the type of molecular sieve being used. Some common designators are XH6 or XH11, with the higher number being a harder bead. Mobile applications, for instance, would use a sieve that is more resistant to attrition due to the extreme vibration conditions.
Another component in some filter-driers is activated charcoal, typically indicated by a designation of “— HH” in the model number. Charcoal has been used for wax removal in refrigeration systems. In light of today’s refrigerants and lubricants, activated charcoal is not a necessary component in a filter-drier.
Along with compatibility, a filter-drier is selected based on size. It should be sized to the line size and the flow capacity of the system. As Krause notes, you can only flow so much through a 3/8-in. port. If you put a 1/4-in. drier on there, you’re going to reduce the port and obviously the flow capacity will go down. Most manufacturers size their driers using one or two pounds of pressure drop.
“When you’re sizing it, you want to size the flow capacity so you’re not adding any undue restriction to the system. If you undersize the drier, you could create a problem where you actually put too much of a restriction in the liquid line, and the quality of your refrigerant going to your expansion device is going to be degraded.”
Consequently, an oversized filter-drier can also be a problem, especially on a critically charged system. That’s because each drier has a capacity to hold refrigerant, says Krause.
“For instance, a 16-cubic-in. drier can hold up to 13 oz of R-22. That’s nearly a pound of refrigerant, which in a critically charged system or a system with a relatively small charge, will create an undercharged condition. The contractor has to understand that he has to add that much refrigerant to the system to make up for that.”
And don’t just replace what’s there with the same kind of filter-drier. It could be that the guy who was there before might not have sized it correctly. As with any component, don’t assume that because the part was on there, that’s the correctly sized component. It could be that it was all the previous guy had in his truck. And while typically any drier is better than no drier, if the proper one was not installed it should be changed out as soon as possible.
Life expectancy
There is no typical lifespan on a filter-drier. If the system is clean and the installation was good, the drier could stay in a system forever. And, since many manufacturers include a small filter-drier in the original equipment, it may never be necessary to install another one. However, once a system is opened up to the atmosphere, it’s just cheap insurance to add a larger filter-drier. Note that if another filter-drier is added, the manufacturer-supplied filter-drier must first be removed.To determine whether or not a filter-drier has reached the end of its lifespan, simply check the pressure drop.
“If there’s more than 3 or 4 pounds of pressure drop across the drier, that means it’s starting to load up and should be changed. I’ve seen systems where there’s so much restriction that it actually frosts on the outlet of the drier,” says Krause.
The other item to check is, of course, the moisture level. A sight glass moisture indicator will tell you if it’s time to change the drier. If the indicator shows wet, the driers must be changed out until a dry condition is indicated.
And, of course, any refrigerant or lubricant change is going to require a new filter-drier. Basically, any component with an o-ring or a desiccant will need to be replaced, because the properties of the different refrigerants and lubricants actually act differently on the o-rings and desiccants.
In either case, it may be time to install a new filter-drier. When the filter-drier is being sweated into the system, it’s not uncommon for the contractor to burn off the ends of the drier. According to Krause, the contractor will typically think it’s the drier’s fault — paint burn.
“You have to understand that’s there for corrosion resistance, and it may not be as important in the Midwest, but if you’re in Galveston, TX, and you burn that paint off, that drier’s going to rust out in less than a year.”
The other thing that’s important to remember is that the fitting is actually brazed to the steel cap. It’s a copper-to-steel joint. If you overheat that enough to where you’re burning the paint off, chances are you’re heating it enough to melt the brazing material that’s holding the fitting to the drier.
“It happens when contractors overheat it. They melt that joint and then they might have a pinhole leak, or the fitting may actually fall off,” says Krause.
Krause’s recommendation is to use soft solder and sweat in, as opposed to braze in. It makes changeout easier, if necessary. And don’t use a big torch tip.
“A 3/8-fitting heats up awfully fast, and that can do damage inside the drier.”
Looking for a reprint of this article?
From high-res PDFs to custom plaques, order your copy today!


