Five Reasons HVAC Systems Don’t Maintain Comfortable Conditions
Hidden reasons the system might not be working
THREE STRIKES: An undersized, leaky, and poorly insulated duct system will always prevent an HVAC system from maintaining comfort. One problem alone is bad enough, but when all three exist, it’s hard to overcome.
It’s the time of year when temperatures across the country push HVAC systems to their limit. You may have already received calls from customers who simply aren’t comfortable and want a solution. There are many situations where the issue is easy to find, such as a refrigerant leak or lack of maintenance.
However, there are situations when the equipment appears to operate flawlessly, but it can’t keep up when outdoor temperatures rise. The equipment is in good operating condition, your refrigerant pressures are close, the temperature drop on the indoor coil is right, and the equipment is sized correctly. What else is there?
If this scenario sounds familiar, you know it’s frustrating and you feel helpless when you don’t know where to go next for answers. Let’s look at five hidden reasons HVAC systems might not keep up when the temperatures get hot, how to test for them, and potential repairs.
INCORRECT FAN AIRFLOW
When everything with the equipment appears to check out but the system can’t keep up, fan airflow is the first place to look. A system that is low on fan airflow cannot remove enough heat.
In cooling mode, a fan should typically move between 350 and 400 cfm (cubic feet per minute) per ton. If you’re testing a three-ton system, this means the fan should move approximately 1050 cfm (350 x 3 = 1050) to 1200 cfm (400 x 3 = 1200) across the indoor coil.
The easiest and quickest way to determine fan airflow is with a total external static pressure (TESP) test and fan table. Use them to plot fan airflow. You can add fan airflow to static pressure readings in four simple steps as I discussed in the November 26, 2018 edition of The NEWS. This provides you a starting point in your diagnostics. If airflow at the air-handling equipment is off, everything else will be.
Your testing may reveal the only issue is the fan speed is set too high for the outdoor unit airflow requirements. This is common when dealing with gas furnaces that have larger tonnage fans paired with smaller outdoor units. If this is your problem, you’re in luck. Adjust the fan speed to the proper setting to solve this problem and then recheck the system to assure it isn’t overcharged.
Looking for quick answers on air conditioning, heating and refrigeration topics? Try Ask ACHR NEWS, our new smart AI search tool. Ask ACHR NEWS
You may also discover that fan airflow is too low — this is when the fun begins. High TESP often accompanies low fan airflow. If you find it in the system, take some additional static pressure measurements to discover any airflow restrictions hidden from a visual inspection. Common restrictions include:
- Restrictive air filter, even though it’s clean
- Restrictive indoor coil, even though it’s clean
- Undersized ductwork
- Restrictive duct fittings and transitions, and
- Poor design and installation (too many elbows, too long duct runs, too many restrictive turns).
Measure static pressure drop across these components to find the highest resistance. When you find the highest pressure drop, you also find the largest airflow restriction(s). Once uncovered, you’ll need to recommend repairs to lower pressure(s) and improve fan airflow.
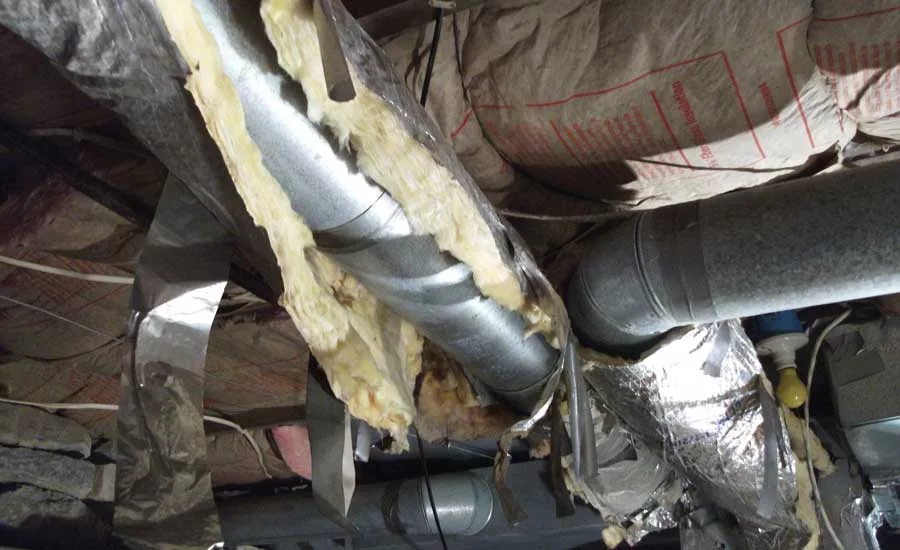
DUCT LEAKAGE
Once fan airflow is correct, it’s important to assure that all air the fan circulates moves through the conditioned space. Mechanical connections in a duct system have the potential to lose air. Any air lost through these leaks negatively impacts system operation and prevents it from maintaining comfort in hotter outdoor temperatures.
Supply ducts transport cool, conditioned air to the living area. If it is lost through leakage before making it into the building, the equipment will operate like it is undersized. It will run continuously and fail to provide comfort. This problem usually doesn’t show up in milder temperatures, when it takes less than full system capacity to keep the building comfortable.
Return ducts bring back living space air to the air handling equipment for conditioning. If additional return air is brought in through duct leakage, it can add nasty air from unintended locations that you don’t want in the home.
If return duct leaks are in a hot attic, additional heat is added to return air that the equipment must remove. The same principle holds true for return duct leaks in a crawlspace. Instead of additional heat, they may add moisture to the return air that the equipment must remove.
To test for duct leakage, you can use a balancing hood to measure total supply air and return air to the living space. Compare fan airflow to total supply register airflow to estimate supply duct leakage, and then compare fan airflow to total return grille airflow to estimate return duct leakage.
When leakage exists (and it always does), a quick TESP test will let you know if the duct system can handle tightening. If you really want to make things worse, seal leakage on an undersized duct system. As leaks are sealed, TESP will increase as pressure relief from the leaks are removed. TESP is a quick “go/no-go” test for duct sealing that can save you a lot of headaches.

Click diagram to expand
REAL PERFORMANCE: Duct system losses can easily cut the system performance in half. While the equipment may operate at a certain capacity in the lab, once installed in the field, the duct system determines true operating performance.
DUCT TEMPERATURE GAIN
Your system can have leak-free ducts that deliver the right amount of air and still fail to maintain comfort if duct temperature gain is an issue. Temperature follows a simple rule: hot goes to cold. If the space surrounding the duct system is hotter than air inside the duct system, heat will flow from the surrounding air into the air in the duct system.
In an attic installation, it is common in many parts of the country for attic temperatures to reach 130° to 140°F in extreme conditions. Combine that with ducts in the same attic space carrying 55°F conditioned air and you have a recipe for an uncomfortable building. That’s a 75° to 85°F delta t (temperature difference)! Ceilings are often insulated with R-38, while duct insulation tops out at R-8. Something about that just doesn’t seem right.
You can measure duct temperature gains with four temperature readings. Make sure the equipment has been running for at least 10 minutes before testing. Start at the air handling equipment and measure supply and return air temperature to determine equipment delta t. Next, measure the farthest supply register and return grille air temperatures to determine worst-case system delta t.
To find equipment temperature drop, subtract the equipment entering air temperature from the equipment exiting temperature.
To find supply duct temperature gain, subtract the equipment exiting air temperature from the farthest supply register air temperature.
To find return duct temperature gain, subtract the farthest return grille air temperature from the equipment entering air temperature.
If your duct system is well insulated with minimal leakage, the temperature change of the equipment and supply and return duct system should be close. There will be some differences, but the temperature change across the duct systems shouldn’t be more than 10 percent of the temperature change across the equipment.
Let’s say you measured a 20° delta t across the cooling equipment and a 10° delta t across the duct system. That would be a 50 percent duct gain (10° ÷ 20° = 50%)! If your equipment was rated at four tons, it would be the equivalent of a two-ton unit due to duct temperature gain.
The most applicable repairs for duct temperature gain are adding duct insulation and sealing duct leakage. Be careful as you choose from various insulation options available. Some insulation types offer high promises but fail to perform in the field.
AIRFLOW IMBALANCES
An HVAC system that is perfectly tight should have balanced airflow through the building. Ideally, each room and the entire building should have the correct volume of airflow. When airflow imbalances exist, there is an unequal amount of airflow through the living space. This creates various issues that prevent a system from maintaining comfortable conditions.
When return airflow from the living space is greater than supply air, negative pressure occurs. This leads to increased humidity and additional heat brought into the building that must be removed. In many cases, it can add load to system capacity that is already maxed out.
When supply airflow into the living space is greater than return air, positive pressure occurs. More supply air is delivered into the space than returned. Conditioned air is pushed outside through any leakage in the building. When this situation happens, it can lead to condensation in building cavities if the dewpoint temperature is high enough.
Some of the most common airflow imbalance causes are:
- Central return grille systems with closed interior doors
- Air balancing issues
- Duct leakage
- Poor duct design and layout.
To discover these imbalances, you need to do a quick pressure test to the outdoors. This requires using a micromanometer and tubing long enough to reach outside, under a door. Turn the HVAC blower to its highest operating speed and watch what happens to building pressure. If it goes negative, there is more air pulled from the space than supplied. If it goes positive, there is more air delivered into the space than returned.
The best repair for airflow imbalances is properly sized and sealed ducts equipped with balancing dampers. This repair assures you can contain and balance airflow. Another option with central return grille systems is to use jumper ducts and transfer grilles.
BUILDING DEFECTS
Up to this point, every issue discussed is related to the HVAC system. However, don’t forget to look at what contains the HVAC system — the building itself. Air leakage and temperature must be controlled in a building to maintain comfort.
If a building leaks air or cannot minimize its temperature gain, you won’t be able to maintain comfortable conditions regardless of how well your HVAC system performs. These defects are hidden from HVAC diagnostics but will directly affect comfort and IAQ.
WIDEN YOUR DIAGNOSTICS AND SOLUTIONS
As you can see, dealing with systems that don’t maintain comfortable conditions requires you to look beyond the equipment. Many of these issues extend into the duct system, so airflow knowledge is an important skill to have. Other repairs fall outside the scope of HVAC work and require additional specialized training or trades being involved.
Whatever the cause, you will never discover the source of these hidden problems unless you test. Develop a systematic approach for how to handle comfort complaints when an HVAC system can’t keep up. Start at the equipment, move to the duct system, and then look at the building. I hope this overview points you in the right direction when you’re called on to address a comfort complaint.
If you’re an HVAC contractor or technician interested in learning more about measuring system performance, contact me at davidr@ncihvac.com or call 800-633-7058. NCI’s website www.nationalcomfortinstitute.com is full of free technical articles and downloads to help you improve your professionalism and strengthen your company.
See more articles from this issue here!
Looking for a reprint of this article?
From high-res PDFs to custom plaques, order your copy today!


