A 10-Step Guide to Installing a Residential Heat Pump
While all projects are unique, HVAC contractors can generally follow the same blueprint when installing a residential heat pump

Heat pumps are now the primary comfort choice for American citizens. In 2022, for the first time, heat pumps outpaced their gas furnace counterparts in annual sales.
This surge in heat pump sales isn’t expected to slow anytime soon. According to Market.us, the global heat pump market is expected to be worth around $151.3 billion by 2032, up from $66.5 billion in 2022, a compound annual growth rate of 8.8% during that timeframe.
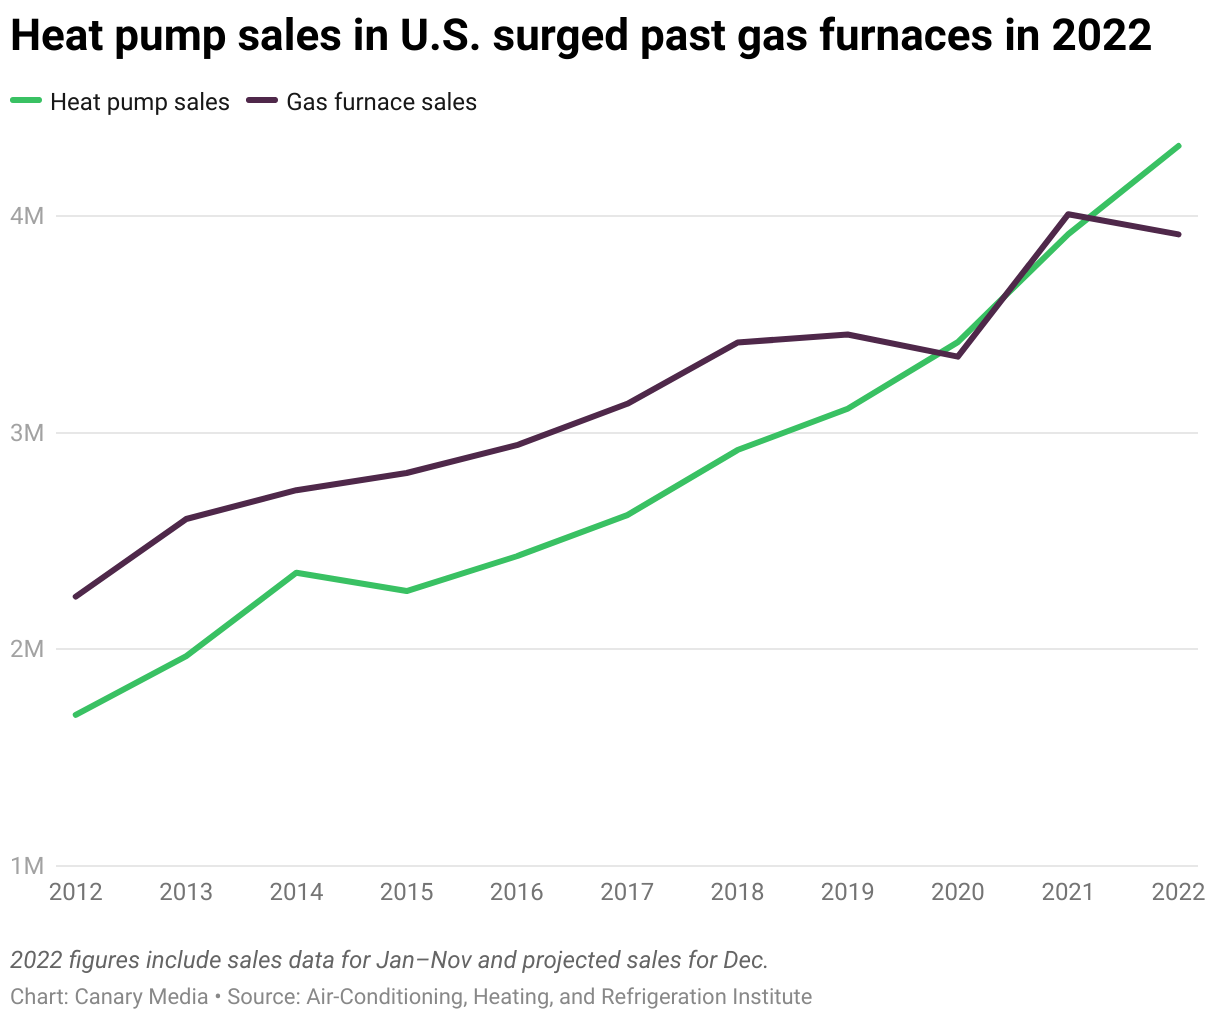
Click chart to enlarge
SURGING SALES: For the first time, annual sales of heat pumps exceeded those of gas furnaces. (Courtesy of Canary Media/Air-Conditioning, Heating & Refrigeration Institute)
While all projects are unique, HVAC contractors can generally follow the same blueprint when installing a residential heat pump. Following a time-tested and substantiated process helps streamline the procedure and minimize errors.
The ACHR NEWS asked a handful of contractors to provide us with a list of the top 10 steps to a pristine heat pump installation. The compilation below offers a foolproof overview of how, when, and why to install a residential heat pump.
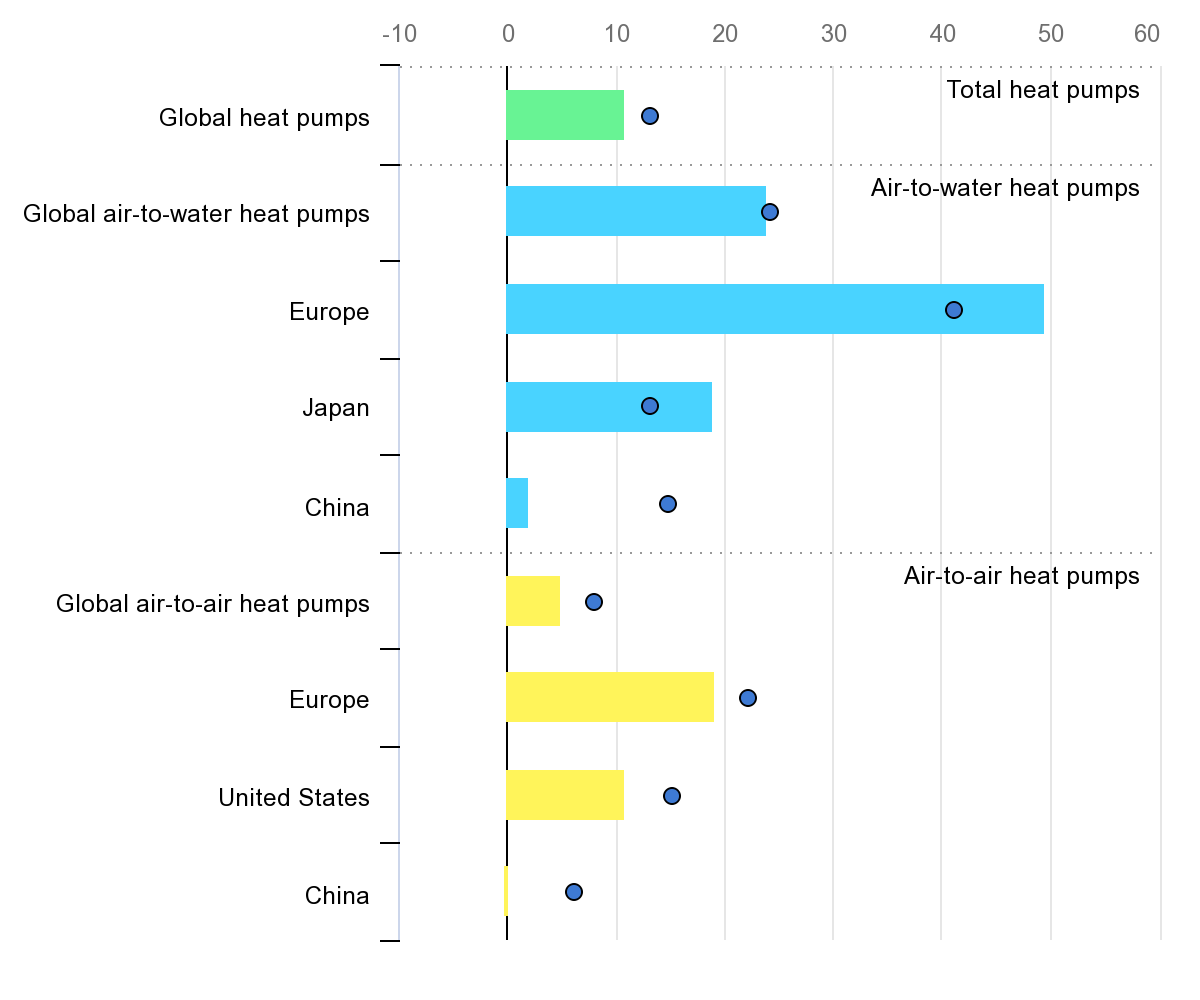
Click chart to enlarge
GLOBAL GAINS: Annual growth in sales of heat pumps worldwide. (Courtesy of IEA 202[X]; Annual growth in sales of heat pumps in buildings worldwide and in selected markets, 2021 and 2022; License: relevant CC license e.g. CC BY 4.0)
Step 1: Preinstallation Interview
An electrification project can be challenging for both the home and the client. Thus, before embarking on a heat pump install, contractors should spend some time with both the customer and the home to gain an understanding of the family and residence’s needs and desires.
“When considering a heat pump, a tech should perform some basic structural tests — blower door, zonal pressure diagnostics, static pressure, etc. — to gain an understanding of the home’s needs,” said Tanner Dickerson, owner and operator, Dickerson Services, Horton, Alabama. “Just as important is the homeowner interview, as it allows the contractor to understand the client’s goals, comfort problems, and budget. This interview should come at a cost. If it’s offered for free, the client will not value the interview and will put very little effort into it.”
Reedie Ward, sales, Comfort Services, Pinehurst, North Carolina, has worked as a technician, installer, and in sales. He insists the most important portion of an installation comes before the actual installation takes place.
Looking for quick answers on air conditioning, heating and refrigeration topics? Try Ask ACHR NEWS, our new smart AI search tool. Ask ACHR NEWS
“Prior to getting started on a project, we send homeowners a four-question comfort quiz, which tells us a little more about the home and the homeowner’s concerns,” he said. “From there, we go over what the customer is experiencing and what his or her expectations are.”
Step 2: Load Calculation
A load calculation helps a contractor determine the HVAC capacity of a residence and appropriately size the comfort system.
(Courtesy of Empire Heating and Air Conditioning)
“We provide a likely load range, which is a per-code basic load calculation that makes several educated guesses,” said Dickerson. “This range then leads to a variety of comfort possibilities.”
While blower door tests are optional for Comfort Services customers, Ward said his team highly encourages them.
“A blower door gives us the most accurate load calculations,” he said. “Giving customers an option progresses the install from transactional to relational because the homeowner now has a say in the process. Rather than just receiving what the sales guy suggests, this puts them in control of the process.”
Step 3: The Offer
Once they’ve perused the menu, it’s time for them to choose their preferred entrée.
“Based on our preliminary findings, we can offer them a system that performs on a scale of poor-good-great,” said Dickerson. “If they decline the blower door test and are not fully invested in the process, the results will likely fall between poor and good.”
Ward agrees that customers should be in charge of their own destinies.
“We do our best to give them an understanding of what they can expect once the system is up and running,” he said. “When spending other people’s money, it is best not to gamble.”
Step 4: Refrigerant Recovery and Equipment Removal
Assuming the customer elects to proceed with the project, now it’s time for installers to address the mechanical system.
The first step is to recover or pump down old refrigerant.
“This is done by either using a recovery machine to pull all of the refrigerant out into a cylinder or the old compressor to pump it into the condenser,” said Dickerson. “The recovered refrigerant should be trapped and valved off, as pumping isn’t always possible.”
Then, the existing equipment needs to be disassembled and removed. While demolition can be fun, it’s important that contractors ensure the process is done carefully.
“Make sure everything is cut loose,” said Dickerson. “This includes the wires, copper lineset, ductwork, and anything holding the equipment in place. Then, make sure the space is clean and prepared for the new equipment.”
Step 5: Prepare for Ancillary Equipment
When installing fresh-air, filtration, or dehumidification products, make sure properly sized fittings mate appropriately with the ductwork and do not impede airflow in any way.
“Lots of times, we will use what we call a big air drop [BAD],” said Dickerson. “This can do a lot for filtration and reduce duct static. This is yet another value-added option that’s built into our service package.”
Step 6: Address the Lineset
When possible, technicians should aim to completely replace the lineset. If the lineset cannot be removed, wipe both lines down with a wipe kit.
“Braze the line set and filter drier with nitrogen flowing through the lines at a low pressure so no carbon deposits or scale gets in the line set and clogs the filter drier or the metering device,” said Ward. “The filter drier goes where the manufacturer says it goes. Some manufacturers say inside, some say outside. Just make sure you put it in the right place.”
At this time, any emergency pans or outdoor unit pads should be added as well.
Step 7: Run a Vacuum
When pulling a deep vacuum, technicians should be meticulous, using a micron gauge to ensure the process is executed carefully and comprehensively.
“If the vacuum is not done properly, moisture could be introduced into the lines, which could cause problems,” said Ward. “Use quality hoses, gauges, and an accurate micron gauge. Follow the instructions on how deep to go with it and what timeframe is acceptable.”
Step 8: Charge the System
“After the line set is verified tight and dry, it’s time to charge the system,” said Ward. “Measure the lineset and charge the system by weight. Again, make sure you’re following the manufacturer’s instructions.”
If no leaks are found, let the system sit for a minimum of 25 minutes and ensure the system doesn’t endure any pressure drop.
“If everything checks out, then start the evacuation with a vacuum pump,” said Dickerson. “You should reach 200 micron at a minimum. Ideally, the system will land under 100. From there, perform a decay test to verify the system is dry and tight. While this is taking place, to be efficient with your time, you should be wiring everything up and connecting ductwork while waiting on evacuation and pressure test to complete.”
Before releasing the charge, a tech should pipe the drains to verify they’re working properly and then wire up the low and high voltage.
“When switching to a heat pump, you’ll likely need bigger high-voltage wires and more wires for the thermostat,” added Dickerson.
Step 9: Set Up the Controls and Commission the System
Now that the system is running, it’s time to set up the equipment controller and adjust the airflow settings.
“Now’s the time a technician should verify airflow via static pressure,” said Ward. “When the system checks out appropriately, you can then check the subcooling or superheat, whichever is applicable, and go over the thermostat settings/operation with the homeowner.”
When commissioning the new equipment, remember that different types of equipment require different processes.
“Communicating, variable-speed equipment must go through a startup and test before adjusting the parameters as needed,” said Dickerson. “Single-stage equipment requires a tech to measure airflow and static pressure before setting the blower speeds.”
Step 10: Post-Installation Interview and Follow-Up Visit
Now that the system is complete, cycle through a premade punch list to verify everything has been completed.
Remember, it’s a technician’s job to install the unit and ensure it’s operating properly. How well that system runs was decided by the customer during the pre-installation process.
“The HVAC unit will work — it will blow cold/hot air — even if it’s installed poorly,” said Ward. “To prevent warranty callbacks, dissatisfied customers, and bad reviews, it’s best to do as much of the technical work as possible before the install. From there, you present the options you feel are best. It’s up to the homeowner whether or not those services are performed, not you. There’s no need to be the hero and take responsibility for bad decisions made by the homeowner.”
After demonstrating a working system, it’s time to discuss maintenance plan options with the customer and, if applicable, schedule a follow-up visit. The system should be branded with the contractor’s company phone number and website for easy follow-up and recurring business.
Looking for a reprint of this article?
From high-res PDFs to custom plaques, order your copy today!


