Six Tips to Improve Static Pressure Measurements
Technicians can overcome frustration and doubt when learning this new skill

Technicians new to static pressure measurement often wrestle with frustration and doubt as they learn this new skill. Two of the most common issues are uncertainty about pressure measurement results and the time involved to gather the readings.
If you can relate, there’s good news. You aren’t the only one. There are many technicians who have been measuring static pressure for a long time, and they have tips to make your life easier. Based on their input and experience, here are six tips I know will help you improve your static pressure measurements.
TIP 1: Understand Why
The most helpful tip is to understand why you measure static pressure. This may sound obvious, but many technicians measure static pressure and don’t understand why they’re doing it. They haven’t internalized the measurement’s importance. The fact is, if you don’t understand why you measure, you’ll probably give up when faced with your first obstacle.
Every successful technician has a purpose for their measurements. They already know what they will do with their readings. For some, it’s uncovering hidden problems that other technicians miss. For others, it’s diagnosing and solving elusive comfort complaints other companies believe are unfixable. Whatever your purpose is, be sure to define it and use it to motivate yourself daily.
My original purpose was to discover airflow issues and their source(s). As I continued testing, this measurement became much more important to me. It grew from a troubleshooting measurement to a lead generator because it led to discovering bad duct systems that kept us busy during slower seasons.
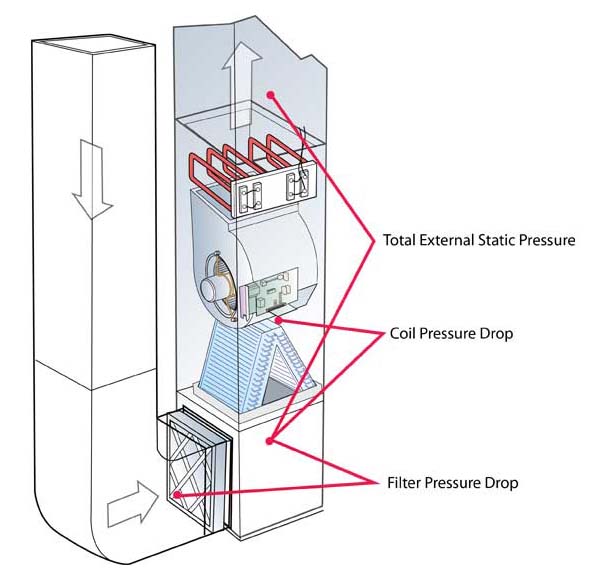
Click diagram to enlarge
Knowing where to measure static pressure can help to reduce your frustration and doubt as you learn this new skill.
Tip 2: Know Your Test Equipment and Accessories
One of the top issues that lead to frustration and doubt is unfamiliarity with the test equipment and accessories. Take the time to read the operating instructions and watch videos on how to use your test instruments. Don’t take them out of the box and start testing before you are familiar with your gear.
Start with your manometer. Make sure you understand the correct settings to measure static pressure. Many digital manometers measure multiple pressure units. Our industry traditionally uses inches of water column (in. w.c.) to measure static pressure in air handling equipment. On some manometers, it’s easy to mistakenly change pressure units from “in. w.c.” to “in. hg.” (inches of mercury) and then wonder why your readings look so weird.
Looking for quick answers on air conditioning, heating and refrigeration topics? Try Ask ACHR NEWS, our new smart AI search tool. Ask ACHR NEWS
Also, consider the manometer position and pressure specific ports. Analog manometers must be level and zeroed before each use. Some manufacturers mark their ports with positive (+) and negative (-) indicators. Make sure you attach your hose to the proper port for the corresponding pressure you plan to measure.
Another simple mistake is not using a static pressure tip. Instead, insert the open end of the tube into the duct system. If you aren’t careful, you may end up measuring a pressure that differs totally from static pressure. To assure you measure only static pressure, use a static pressure tip.
Tip 3: Pay Attention to Test Locations
If you test in the wrong test locations, the results can drive you crazy and you won’t trust your readings because they are all over the place. In previous articles, I’ve discussed the “as-shipped” concept that Trainer Scott Johnson introduced to National Comfort Institute (NCI).
We use it to help technicians better understand where to measure total external static pressure (TESP). The idea is straightforward — think about how the air-handling equipment comes from the factory “as-shipped” in the box. When you unpackage it, what’s included? If it isn’t in the box, the manufacturer didn’t include it in their TESP rating.
It’s also easy to take your measurements in turbulent areas that result in questionable readings. Consider what happens when you get too close to the inlet or outlet of a blower. The air conditions are too turbulent to get a good reading, so you will want to avoid these areas.
It’s best practice to avoid any sharp turns or corners. Air doesn’t like to make hard turns, and if you’re in these areas, you might be in a location with little or no flow that affects your readings. If you’re in doubt, try another test location and see what your results are.
Tip 4: Organize Your Test Equipment
Skilled technicians who consistently measure static pressure have everything they need in a single place. They carry all the necessary test instruments and accessories they need on each call. This includes:
- Manometer — analog or digital
- Static pressure tips and tubing — neoprene or silicone
- 3/8-inch test port plugs
- Small drill/impact gun with a unibit and 3/8-inch drill bit with a sheath/stop
- Thin screwdriver — for cleaning out internal duct liner.
Additional information to make sense of the pressure readings is also a part of their toolkit. This includes:
- Static pressure test diagrams — to help remember test port locations
- Static pressure budgets — to make sense of the pressure readings
- Field reference guides — for those who have been to NCI training classes.
Keep these items together, not randomly scattered throughout your service van. This improves your time management. I bet you can easily find your favorite set of refrigeration gauges blindfolded. These test instruments should be the same — know where they are.
I know a lot of technicians who carry these items in their everyday service bags, while others keep them in a dedicated hard case or tool bag. Personally, I kept mine in a ballistic nylon briefcase made by Fieldpiece with the rest of my test instruments. The key is to have them with you.
Tip 5: Have a Procedure
To measure static pressure in the most efficient way possible, you need a repeatable procedure that works for you. This may sound strict, but it’s only a plan to help account for variables that affect getting your measurements.
The two issues that will affect your procedure the most are equipment type and installation location. These two factors determine where and how you install your test ports. Once you know how to account for them, the rest of the procedure stays the same. Here’s an example:
- Identify the air handling equipment type — gas furnace, air handler, package unit.
- Identify test port locations and install the test ports.
- Find and record equipment maximum rated total external static pressure (TESP) from the indoor nameplate.
- Hook up your manometer, tubing, and static pressure tip.
- Turn on the equipment so it operates at the highest blower speed.
- Measure and record your four static pressure readings.
- Calculate TESP and pressure drops.
- Compare measured TESP to maximum rated TESP.
- Compare measured pressure drops to static pressure budgets.
- Identify restrictive components based on the highest pressures.
The improvement of your skills is in direct proportion to the amount of practice you’re willing to invest. The first few times you measure static pressure, it will take some time because you’re new to it. Until I get familiar with a new skill, I like to use a checklist to reduce the anxiety of trying to remember every small step. Try it and see how it works for you.
Tip 6: Don’t Procrastinate
Unless you’re being forced to do it, the decision to measure static pressure is up to you. The key is to get started, don’t procrastinate — the time will never be right. To help you out, I’m offering a Static Pressure Quick Start Guide that includes the basic information you need to start measuring. Send me an email to request your copy.
Looking for a reprint of this article?
From high-res PDFs to custom plaques, order your copy today!


