Hammer-Free Drive Cleat Installation in Light Commercial Ductwork
Hammer-free drive cleat installation offers safe and consistent duct joints, inventor Hiram Rodriguez argues
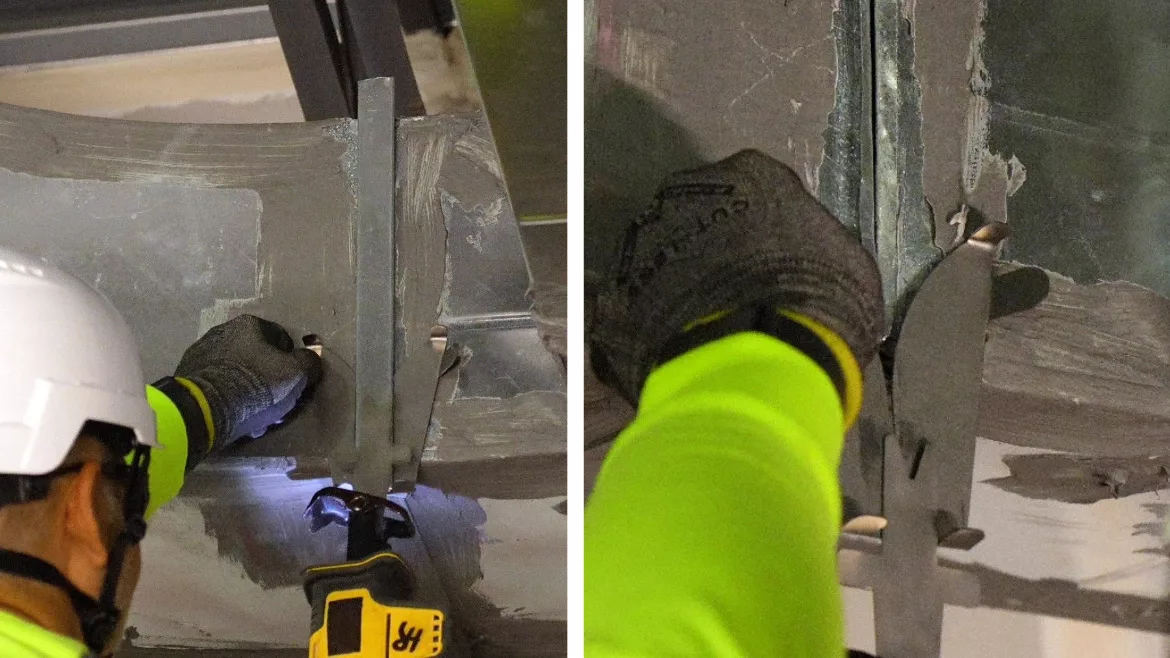
LEFT: The Drive Cleat Tool advances the cleat along the joint with smooth, controlled force – no hammer required. Right: Sheet metal worker uses the Alignment Tool to stabilize and align the duct flanges before fastening.
In light commercial and extended residential HVAC installations, duct sections between 8" and 14" are commonly joined using traditional drive cleats. While the method is familiar and effective, installers have long faced challenges associated with using a hammer to advance the cleat along the joint.
Across various job conditions – overhead work, confined mechanical closets, retrofit work, and ladder-based installation – technicians frequently encounter:
- Minor flange misalignment at presentation
- Duct movement during hammering
- Deformation of lighter-gauge flanges
- And cumulative strain associated with repetitive impact
These factors can slow assembly and compromise precision, especially when installers must maintain alignment while striking the cleat.
This case study explores the application of a patented hammer-free method for drive-cleat installation that replaces impact with controlled, linear force.
The Product Applied in This Case
The project evaluated the Duct Alignment and Securement System, a two-component solution recently approved for patent issuance by the United States Patent and Trademark Office (USPTO). The system works with traditional drive cleats and standard rectangular duct profiles used in light commercial work.
It consists of:
- Alignment Tool (Flange Guide Device)
A tapered guide inserted between the flanges to stabilize the joint prior to fastening. It provides partial entry on its own but requires controlled axial assistance to seat fully.
- Drive Cleat Tool (Securement Device)
A reciprocating-powered attachment that connects to any Sawzall-type tool. It advances a cleat using progressive linear force and can also reverse to remove the cleat or retract the alignment tool.
Both tools integrate directly into the drive-cleat method already used by installers, without altering duct fabrication or cleat geometry.
Field Scenario
The contractor implemented the system on a light commercial job involving several short horizontal runs and vertical drops within a mixed-use building. Duct sections measured between 8" and 14" and were fabricated with standard edges suitable for drive cleats.
During installation, the team experienced routine alignment issues due to limited workspace, ladder-based positioning, and lateral pressure from existing utilities. Hammering cleats into place occasionally displaced sections, requiring installers to reposition ducts before continuing.
To evaluate a potential improvement, the contractor selected five joints to be installed using the patented hammer-free system.
Presentation and Initial Alignment
The installer presented the two duct sections and inserted the Alignment Tool between the flanges. This stabilized the joint and helped maintain alignment without relying on impact.
Axial Advancement of the Alignment Tool
Using the Drive Cleat Tool attached to a reciprocating saw, the installer applied controlled forward pressure. The tool advanced the guide until the flanges were fully aligned and ready for the cleat.
Drive Cleat Installation
A standard drive cleat was placed at the leading edge of the joint. The Drive Cleat Tool pushed the cleat progressively along the flange channel using linear movement. This eliminated vibration from hammer strikes, joint displacement, and repeated alignment adjustments.
Cleat Removal for Rework
In one instance, a duct section required a slight height adjustment after inspection. The installer reversed the tool and extracted the cleat cleanly, without distorting the flanges, allowing the joint to be reopened and corrected.
Results Observed
After comparing conventional hammer-based assembly against the hammer-free method, the contractor noted:
- Improved alignment consistency, as installers maintained the joint without repeated repositioning,
- Cleaner, straighter cleat tracking, which was particularly beneficial for visible runs near occupied or service areas,
- Reduced deformation of 26- and 28-gauge material,
- Less installer fatigue, especially during overhead fastening,
- And faster rework cycles due to clean cleat extraction.
Technicians reported a significantly greater reduction in physical effort compared to traditional methods, especially on elevated or repetitive installations where hammer use is normally the main source of fatigue. Although no formal time study was conducted, installers emphasized a more stable workflow, fewer interruptions due to joint shifting, and an overall perception of reduced physical load during cleat closure.
Installer and Supervisor Feedback
The lead installer commented:
"The biggest benefit was stability. Once the guide was in place, the joint did not move. The cleat advanced without fighting the duct."
The field supervisor added:
"In tight spots, not swinging a hammer made a big difference. The process was quieter and the joints looked cleaner."
Client Observation
The building owner, whose space remained occupied during the project, noted reduced disruption compared to expectations for impact-based fastening.
"The work was noticeably quieter than we expected. With staff working near the mechanical space, that made a clear difference," the owner said.
Conclusion
This case demonstrates that drive-cleat fastening can be performed more consistently and ergonomically using a hammer-free method based on controlled linear force. The patented Duct Alignment and Securement System retains full compatibility with traditional drive-cleat duct construction while reducing deformation, installer fatigue, and alignment interruptions.
Because it requires no change to duct fabrication, tooling, or cleat geometry, it offers a practical improvement for installers working in light commercial and extended residential environments.
High-resolution photos of the installation, tools, and completed joints are available for editorial consideration.
Looking for a reprint of this article?
From high-res PDFs to custom plaques, order your copy today!


