A technician often has to sketch or design ductwork and the other parts of an HVAC system. Sometimes you have to sketch the room or building you are working with. This means working with lines, angles, squares, rectangles, circles, and other shapes. This article shows you how to draw and work with these different figures.

This article is not a course in layout. However, it will give you some basic skills needed on the job. You will learn some basic principles that apply to constructing many different shapes.

Figure 1. Compass, dividers, protractor, and drafting square.

The only tools you need to make these shapes are astraight rulerand acompassordividers(Figure 1). It is also useful to have aprotractor(to measure angles) and adrafting square(to make square corners).

Figure 2. Swinging an arc.

Both dividers and compasses have two legs that can be set to any distance (within the range of the instrument). Thecompasshas a lead or a pencil attached to one leg, so it is used to draw on paper.Dividershave two points. They are used to step off and divide distances, and to establish a point that is then marked with a pencil or other tool. Dividers are commonly used on the job.

Swinging an arc (Figure 2) with dividers or compass means keeping one leg fixed and drawing an arc with the other.

Figure 3. Angles.

ANGLES

Any shape that is made of straight lines has angles, so knowing how to measure angles and how to use them is a basic skill in HVAC work.

An angle is the figure formed by the intersection of two straight lines. Figure 3 shows various angles. The most common angle is a square corner. Most of the angles you work with on the job are square corners.

The vertex of an angle (Figure 3) is the point where the two legs (sides) of the angle meet. It is often called the centerpoint. An acute angle is smaller than a square corner. An obtuse angle is larger than a square corner (Figure 3). Notice the symbol in Figure 3 that indicates a square corner (90 degrees) and the symbol for any angle.

Figure 4. Degrees measure the angle, not the length of the legs.

Degrees
Just as a length is measured in inches, angles are measured indegrees. A square corner contains 90 degrees (Figure 3). A 45 degree angle (Figure 3), which is half of a 90 degree angle, is widely used. A 30 degree angle is also common. The length of the legs on the angle has nothing to do with the number of degrees in the angle. Both of the angles in Figure 4 are 45 degree angles.

Figure 5. Two 90 degree angles total 180 degrees, which is a straight line.

If two 90 degree angles are placed back-to-back (Figure 5), they total 180 degrees. The sides of this angle form a straight line, so a 180 degree angle is a straight line. Adding two more 90 degree angles totals 360 degrees, which is a full circle (Figure 6).

Angles are measured with a protractor. A flat protractor (Figure 1) is used for drafting. A sliding blade protractor (Figure 7) is used in the shop and on the job.

Figure 6. There are 360 degrees in a circle.

Degrees and Minutes
Angles in the HVAC industry are seldom measured to a greater accuracy than whole degrees. However, you should be aware that the degree is divided into 60minutes. The angle 12 degrees, 30 minutes is the same as 12-1/2 degrees.

You are not likely to need to use degrees divided into minutes in work in the HVAC industry. You should know the term in case you run into it.

Figure 7. A sliding blade protractor.

Creating a 90 Degree Angle
The most common shapes with straight sides (squares and rectangles) are made with 90 degree angles. It is important to be able to construct 90 degree angles to make these figures accurately.

To develop a 90 degree angle, draw a straight horizontal line and then erect a line that is perpendicular to it. This means that it is straight up and down in relation to the horizontal line. The angle formed on each side is 90 degrees. The procedure is called squaring up a line or erecting a perpendicular. You can do this by using a drafting square to trace a 90 degree angle (Figure 8).

Figure 8. Using a rule and a square to create a 90 degree angle.

You can also use a rule and dividers or compass to create a 90 degree angle, as shown in Figure 9:

  • Draw a straight line. Mark a point (A) that will be the vertex of a 90 degree angle.

  • Use a compass or dividers set at any convenient distance to swing equal arcs to establish two points equal distances from A. These are labeled B and C in Figure 9.

  • Swing one arc from point B and an equal arc from point C so that they cross (point D) someplace over point A.

    Figure 9. Creating a 90 degree angle.

  • Draw a line from point A through point D (Figure 9). This line is perpendicular to the horizontal line and it forms two 90 degree angles.

    Copying an Angle
    Sometimes an angle must be measured on the job in order to duplicate it in the shop or drafting room. There are two common ways to this. You can use a rule to copy an angle (Figure 10):

  • Measure out any convenient distance (a) on one side of the angle.

  • Square up a line from that point and measure distance b.

    Figure 10. Using a rule to copy an angle.

  • Measure distances a and b on paper or metal. Draw in line AB, and the angle is duplicated.

    You can also use a rule and dividers or compass to copy an angle (Figure 11):

  • Step 1: On the angle to be copied, use point O as the centerpoint and use any convenient radius to swing arc ab.

  • Step 2: Draw a line on which to copy the angle, with O' as the centerpoint. Swing arc a'b', using the same radius used on the angle to be copied.

    Figure 11. Copying an angle with a rule and dividers or compass.

  • Step 3: Set the dividers or compass to distance ab on the angle to be copied. Swing this same distance from a' to determine b' on the copy of the angle. Draw line O' b' to copy the angle.

    Bisecting an Angle
    Angles often have to be bisected (divided into two equal parts). Bisecting an angle may be a useful way to create a given angle. For example, to create a 45 degree angle, you can bisect a 90 degree angle. To create a 15 degree angle, you can bisect a 30 degree angle. Use dividers and rule to bisect an angle (Figure 12):

    Figure 12. Bisecting an angle.

  • Swing equal arcs using O as the centerpoint to establish points C and D. The arc can be any convenient length.

  • Use points C and D as centerpoints and swing equal arcs that intersect at point E. These arcs can be any convenient length.

  • Draw a line from O to E. This bisects the angle.

    Dividing an Angle in Three Parts
    An angle can be divided into three equal parts. This could be done to create a given angle. For example, to create a 30 degree angle, divide a 90 degree angle into three parts. To create a 60 degree angle, use two of the 30 degree angles formed by dividing a 90 degree angle into three parts. Follow this procedure to divide an angle into three parts (Figure 13):

    Figure 13. Dividing an angle into three parts.

  • Swing an arc from point O at any convenient length. The arc intersects the angle at F and G.

  • Divide arc FG into three equal spaces. This is usually done by stepping off with dividers. Use trial and error until the length of each segment is the same.

    Draw lines from point O through each of the dividing lines on the arc. If the original angle is 90 degrees, then the three angles are each 30 degrees. Two of the divisions make a 60 degrees angle.

    The same method can be used to divide an angle into four, five, or any other number of equal parts.

    STRAIGHT LINE FIGURES

    You may have to sketch ducts, plenums, rooms, buildings, and other structures which are usually made up of straight line figures such as squares and rectangles. You may have to deal with trapezoids, pentagons, and other shapes as well. All of these figures are made of straight lines and angles.

    Figure 14. Four-sided figures.

    A square (Figure 14), as you know, has four equal sides and four 90 degree angles. A rectangle (Figure 14) has opposite sides that are equal and four 90 degree angles. Drawing accurate squares and rectangles is easy. You need a ruler to measure the sides. You can make sure the corners are 90 degree angles by using a square or by using a straight edge and compass or dividers to square a line as described above in "Creating a 90 Degree Angle."

    A trapezoid (Figure 14) has two sides that are parallel and two sides that are not parallel. The angles could have any number of degrees. Some rooms, buildings, or windows may be trapezoids. To copy a trapezoid, use a ruler to measure the sides. Copy the angles with the method described above in "Copying an Angle" (or use a protractor).

    Figure 15. Figures with equal sides.

    Some figures have more than four sides that are equal in length. The most common are shown in Figure 15:

    Pentagon - five sides

    Hexagon - six sides

    Octagon - eight sides

    If the sides are equal, the angles will all be equal. You can copy any such figure by measuring the sides and copying the angle.
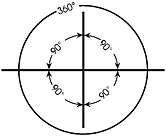
    Figure 16. Use the length of the radius to step off the sides of a hexagon.

    The hexagon is easy to construct. Use dividers or a compass to construct a hexagon (Figure 16):

  • Draw a circle to the size of the hexagon required.

  • Set dividers or a compass to the radius of the circle. Use this length to step off the circle into six equal parts.

  • Draw lines to connect the points on the circle.

    CIRCLES

    A circle is another basic figure used in the industry. You will often deal with round ducts. Sometimes rooms or buildings are based on circles or parts of circles. The basic parts of the circle are shown in Figure 17:

    Figure 17. The parts of a circle.
  • Centerpoint - The center from which a circle is drawn. The centerpoint is the same distance from any point on the circle.

  • Circumference - The distance around a circle.

  • Diameter - The length of a line across a circle that passes through the centerpoint.

  • Radius - Half the diameter. The distance from the center to the circumference.

  • Arc - Part of a circumference.

    Use a compass to draw a circle. Set a compass to the length of the radius required in order to copy a circle or arc.

    Excerpted and reprinted from Math for the Technician by Leo A. Meyer, one of the books in the Indoor Environment Technician's Library series published by LAMA Books.

    Publication date: 11/13/2006