Troubleshooting and servicing refrigeration and air conditioning systems can be a challenging process for entry-level or experienced technicians. Regardless of your experience, it is essential that you have a solid understanding of the fundamentals of refrigeration in order to troubleshoot a system of any size, in any location.
You also need to have the right tools and know-how to apply these principles to use the tool quickly and efficiently. A solid understanding of superheat and subcooling is essential.
Troubleshooting often requires simultaneous knowledge of temperature, pressure, voltage, and current values in a system. A single-function meter won’t permit a complete analysis of the system. Frequently, multiple tools are required.
This article provides information on troubleshooting a refrigeration system while applying the principles of superheat and subcooling. It may also teach you the proper methods to tackle some typical troubleshooting tasks using thermometers, digital multimeters, pressure/vacuum modules, and accessories.
The Refrigeration Cycle
Heat flows naturally from warmer to cooler areas. Keeping this in mind, the refrigeration cycle consists of seven stages:
- Compression of the hot gas;
- Cooling;
- Condensing;
- Subcooling;
- Expansion;
- Evaporation; and
- Superheating.
A basic vapor-compression refrigeration system consists of four primary components: a metering device (a capillary tube, fixed orifice/piston, or a thermostatic expansion valve), evaporator, compressor, and condenser.
The basic cooling process begins as liquid refrigerant under high pressure is forced through a metering device into a lower pressure region within an evaporator, where it begins to change to a vapor state. (See Figure 1.)

Figure 1: The basic cooling process.
While the refrigerant is circulated through the cooling coils of the evaporator, it absorbs heat from the area surrounding the coils. As it moves through the evaporator, it steadily changes from liquid to vapor. This is called boiling, or the saturation phase. The vapor refrigerant (and the heat it carries) continues to move through the coils to the inlet of the compressor.
The compressor reduces the gas to a high pressure while simultaneously raising the temperature of the gas. The hot gas is then delivered to the condenser, where it is cooled, dissipating the heat and steadily converting the gas back to a liquid state. A liquid receiver captures and stores the refrigerant between the condenser and the metering device.
Note: Liquid receivers are not typically used on refrigeration systems, which commonly rely on capillary tubes or fixed metering devices.
Liquid is then pumped out of the receiver into the liquid line. When the liquid under high pressure reaches the metering device, the cycle starts over.
While servicing most refrigeration systems, the technician measures the temperature and pressure to determine system performance. Closely monitoring temperature and pressure to verify proper control and operation can ensure longer system life and reduce energy consumption. Often, measuring temperatures or pressures at key points in a system can pinpoint trouble spots.
Superheat Measurement
In the system’s evaporator, conversion of the refrigerant from liquid to vapor involves adding heat to the liquid at its boiling temperature (saturation temperature). Any additional temperature increase above the boiling point is called superheat.
Finding suction line superheat requires finding the suction pressure and two temperatures — the evaporator boiling temperature at a given pressure, and the temperature of the refrigerant at the outlet of the evaporator on the suction line. This is commonly referred to as the superheat temperature-pressure method.
You can find the boiling temperature by using a pressure-temperature (PT) chart. On systems using CFC and HCFC refrigerants, and some newer ozone-friendly refrigerants such as R-134a, boiling temperature remains constant during the saturation or boiling phase, provided that the pressure remains the same within the evaporator.
On newer refrigerant blends, the temperature changes during the boiling or saturation phase. This is referred to as glide. Newer refrigerants with a temperature glide of 10 degrees F (5 degrees C) or higher use the dew point (DP) temperature: the temperature of the refrigerant at the outlet of the evaporator coil. (See Figure 2.)

Figure 2: Newer refrigerants with a temperature glide of 10 degrees F (5 degrees C) or higher use a term called the dew point (DP) temperature: the temperature of the refrigerant at the outlet of the evaporator coil.
The best method to determine superheat is to use a pipe clamp temperature probe (such as the Fluke 80PK-8) and a pressure/vacuum module (such as the Fluke PV350) in conjunction with a suitable digital multimeter with type-K thermocouple measurement.
The pipe clamp allows pipe temperature measurements to be made more quickly and accurately than other methods, because it clamps directly to the pipe without the need to add insulation, tape, or a Velcro® strap (as in the case of a bead thermocouple). The pressure/vacuum module allows accurate and quick pressure measurements.
Note: When measuring for superheat, remember to allow the system to run long enough for temperatures and pressures to stabilize while verifying normal airflow across the evaporator.
Using the pipe clamp, find the suction line temperature by clamping the probe around a bare section of the pipe at the outlet of the evaporator. Pipe temperature can be read at the inlet of the compressor on the suction line if the pipe is less than 15 feet from the evaporator and there is a minimum pressure drop between the two points. (See Figure 3.) The best results are obtained when the pipe is free of oxides or other foreign material.
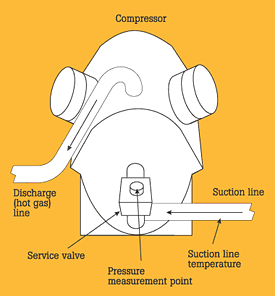
Figure 3: Pipe temperature can be read at the inlet of the compressor on the suction line if the pipe is less than 15 feet from the evaporator, and there is a minimum pressure drop between the two points.
Next, attach the pressure/vacuum module to the suction line service valve (or refrigerant service port on your manifold gauge set). Make a note of the pipe temperature and pressure. This pressure reading will be that of the boiling refrigerant inside the evaporator, assuming no abnormal restrictions exist within the suction line.
Using this pressure value, find the evaporator boiling temperature from a PT chart for the refrigerant being used. Subtract the boiling temperature from the suction line temperature to find the superheat.
The suction line temperature may also be taken by attaching a bead thermocouple to the suction line. Be careful to insulate the thermocouple and use a heat-conducting compound to minimize errors due to heat loss to ambient air.
Subcooling Measurement
In the system’s condenser, conversion of vapor to liquid involves removing heat from the refrigerant at its saturation condensing temperature. Any additional temperature decrease is called subcooling.
Finding liquid line subcooling requires determining the condensing pressure and two temperatures: the condensing temperature at the measured condensing pressure and the temperature of the refrigerant at the outlet of the condenser on the liquid line.
The liquid line temperature involves measuring the surface temperature of the pipe at the outlet of the condenser. (See Figure 4.)
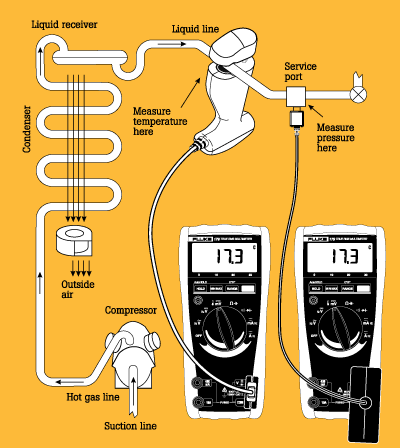
Figure 4: The liquid line temperature involves measuring the surface temperature of the pipe at the outlet of the condenser.
Note: Condensing temperature is derived using the PT chart. On new refrigerant blends with high temperature glide, this is called the bubble point (BP) temperature. (See Figure 2.)
To measure subcooling with a pipe clamp, allow the system to run long enough for temperatures and pressures to stabilize. Verify normal airflow, then find the liquid line temperature by clamping the pipe clamp around the liquid line. Attach the pressure/vacuum module to a service port on the liquid line (or discharge line at the compressor if a liquid line service valve port is not available).
Make a note of the liquid line temperature and pressure. Convert the liquid line pressure to temperature using a PT chart for the refrigerant type being used. The difference of the two temperatures is the subcooling value.
Trouble Diagnoses
Data from superheat and subcooling measurements can be used to determine various conditions within the system, including checking the refrigerant charge and verifying the operating condition of the metering device. These measurements can also be used to determine the efficiency of the condenser, evaporator, and compressor.
Before drawing conclusions from the measured data, it is important to check external conditions that influence system performance. In particular, you should inspect and verify proper airflow in cubic feet per minute (cfm) across coil surfaces, and line voltage to the compressor motor and associated electrical loads.
Remember to look for obvious problems at the coil surfaces, such as dirty air filters inside the unit, or leaves and debris restricting airflow on the condenser outside.
The superheat value can indicate various system problems, including a clogged filter-drier, refrigerant undercharge, overcharge, faulty metering device, restricted airflow, or improper fan motor or blower direction. Suction line superheat is a good place to start diagnosis; a low reading suggests that liquid refrigerant may be reaching the compressor.
In normal operation, refrigerant entering the compressor is sufficiently superheated above the evaporator boiling temperature to ensure that the compressor draws only vapor and no liquid refrigerant. On traditional systems, which use mechanical metering devices such as TXVs or cap tubes, the superheat heating will vary between 8 degrees and 20 degrees. On newer systems that use electronic expansion valves and solid-state controllers, it is possible to see the superheat setting as low as 5 degrees to 10 degrees.
A low or zero superheat reading indicates that the refrigerant did not pick up enough heat in the evaporator to completely boil into a vapor. Liquid refrigerant drawn into the compressor typically causes slugging, which can damage the compressor valves and/or internal mechanical components. Additionally, liquid refrigerant in the compressor, when mixed with oil, reduces lubrication and increases wear, which leads to premature failure.
On the other hand, if the superheat reading is excessive (greater than 20 degrees to 30 degrees), it indicates that the refrigerant has picked up more heat than normal, or that the evaporator is being starved of refrigerant. Possible causes include a metering device that is underfeeding, improperly adjusted, or simply broken.
Additional problems with high superheat could indicate a system undercharge, refrigerant restriction, moisture in the system, blocked filter-drier, or excessive evaporator heat loads.
Use Subcooling To Troubleshoot
Refrigerant is usually subcooled between 10 degrees and 20 degrees at the outlet of the condenser.
An improper subcooling value can indicate various system problems, including overcharge, undercharge, liquid line restriction, or insufficient condenser airflow (or water flow when using water-cooled condensers). For example, a very low reading (between 0 degrees to 10 degrees subcooling) indicates that the refrigerant did not lose the normal amount of heat in its travel through the condenser.
Possible causes for this condition include insufficient airflow over the condenser, metering device problems such as overfeeding, maladjustment, being stuck too far open — or the system may be undercharged. Often the problem is simply that the condenser coil surface needs to be cleaned thoroughly to eliminate airflow restriction.
Excessive subcooling means the refrigerant was cooled more than normal. Possible explanations include overcharging, a restricted metering device, maladjustment (underfeeding), or faulty head pressure control during low ambient conditions.
In Summary
The next time you are called to service or maintain any HVACR equipment, remember to be patient and apply the principles you have learned here. Check the superheat and subcooling at the unit.
And make sure to visually inspect the equipment, to verify that all coil surfaces are clean and that fans are running in the right direction.
Jourdan is an HVAC instructor at Wenatchee Valley Community College in Wenatchee, Wash., and a consultant to Fluke. He can be reached at gjourdan@msn.com.
Publication date: 06/02/2003

Report Abusive Comment