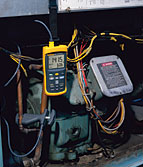
Meters designed to accurately measure both AC voltage and AC current are especially useful. They let you measure current without breaking into the electrical circuit.
COMPRESSOR ELECTRICALS
To check the compressor for electrical problems, remove the electrical terminal cover and check the following external connections.1. Check line voltage at the load center with the compressor off. Low line voltage causes the motor to draw more current than normal and may result in overheating and premature failure. Line voltage that is too high will cause excessive inrush current at motor start, again leading to premature failure.
2. Check line voltage at the motor terminals with the compressor running. The voltage should be within 10 percent of the motor rating.
3. Check running current. The readings should not exceed the manufacturers' full-load rated amps during heavy load periods. Low amps are normal during low-load conditions. Excessive high current may be due to shorted or grounded windings, a bad capacitor, a faulty start relay, or an indication of excessive bearing fatigue.
Caution: When performing electrical measurements on compressors with internal thermal motor protection devices that have been running extremely hot, be sure to give the compressor time to cool down prior to the electrical test. This will allow the device to reset to its normal position.
MOTOR FAILURES CAUSED BY REFRIGERATION SYSTEM
Sometimes a service tech might misdiagnose what is actually a defective compressor with electrical winding failures, as being caused by an electrical system problem. Mechanical system failure or inferior installation and service practices are often the true cause of compressor electrical problems. These problems include:
Here are some simple procedures to diagnose these refrigeration problems using DMMs, clamp meters, digital thermometers, pipe clamps, infrared (IR) thermometers, and pressure/vacuum modules.
The problem: compressor bearing failure or lockup. This may be caused by poor piping practices, which lead to oil clogging in the system and result in insufficient oil return to the compressor. If the bearings don't lock up and continue to wear during these conditions, the rotor will lower into the stator housing, shorting out the windings.
Diagnose it:
1. Measure the compressor amps. They should not exceed the manufacturer's full-load ratings. Worn bearings will cause higher-than-normal amp readings.
2. Inspect the oil level via the compressor sight glass. If there is no sight glass, use your IR thermometer to measure the sump of the compressor housing. The oil level can be detected with a temperature probe. The sump temperature will be different on the compressor housing at the oil level.
Caution: Whenever an oil problem exists due to poor piping practices, the correct remedy is to fix the piping. Do not to continue to add more oil to the system.
The problem: high discharge temperatures. These may be caused by high head pressures or high superheat.
Diagnose it:
1. Measure the compressor discharge line using an IR thermometer on a dull section of pipe.
2. Measure the discharge pressure using a pressure/vacuum module.
3. Convert the refrigerant pressure to temperature and compare it to the ambient air temperature. If the temperature difference is greater than 20° to 30°F (11° to 17°C), either noncondensible gases are in the system or airflow is restricted across the condenser.
Note: Temperature differences will vary due to original manufacturer's design and efficiencies.

Diagnose it:
1. Using a digital thermometer, place a bead thermocouple on the discharge side and the return side of the coil.
2. Record the temperature difference on the air conditioning unit. Expect about 18° to 22°F (10° to 12°C) temperature difference. On refrigeration units, you would expect about 10° to 15°F (5° to 8.5°C) temperature difference.
Note: Temperature differences may vary depending upon initial design and humidity requirements.
The problem: extremely low suction pressures.
Diagnose it:
1. Install the pressure/vacuum module and your DMM at the compressor.
2. Record the suction pressure. Convert the refrigerant pressure to temperature using a pressure-temperature (PT) chart.
3. Measure the return air temperature before the evaporator. Compare the refrigerant temperature to the desired evaporator return air temperature.
On air conditioning units, expect about 35° to 40°F (19° to 22°C) temperature difference and refrigeration units expect about 10° to 20°F (5° to 11°C) temperature difference.
The problem: liquid refrigerant is flooding back to the compressor.
Diagnose it: Determine the superheat using your pressure/vacuum module, pipe clamp, and your DMM.
1. Check suction pressure and convert the refrigerant pressure to temperature, using your PT chart.
2. Measure the suction line pipe temperature.
3. Compare the difference of the two temperatures. If there is no temperature difference, you are bringing liquid back to the compressor. If there is a temperature difference between 10° to 20°F (5° to 11°C), you have normal superheat and you are not slugging the compressor with unwanted liquid.
SUMMARY
Troubleshooting and servicing refrigeration, air conditioning, and heat pump systems is a challenge for any technician, entry level or experienced.Regardless of the size or location of the system, it is vital that you understand the principles and tools needed to perform proper troubleshooting efficiently.
Duane Smith is a Fluke specialist on digital multimeters. A 30-year veteran, Smith trains test tool users, troubleshoots field applications, and helps develop new DMMs and electrical testers. He may be contacted at 425-446-5681; duane.smith@fluke.com.
Publication date: 06/19/2006

Report Abusive Comment