

The next group I’m going to pick on are the electricians. I don’t want to get into trouble for picking on people, so here is a little story to back me up.
DEFECTIVE BOILERS
One time I had a buddy with 90 “defective” boilers; this was the guy who forgot to check the gas meters. The next time he called me he had 265 defective boilers.Of course, my first question was, “Do you have gas?” After I got called some nasty names, we proceeded with the questioning. I asked him if he had 110 V to terminal L1 and L2. This is always our starting point, making sure the electricity is turned on. I got the classic answer: “How do I know, I’m only a plumber.”
I asked to speak to the electrician, who confirmed that he had power to L1 and L2. I asked what the voltage was; sometimes you have lower voltage and the system won’t work. He confirmed that he had 120 V. Next, I asked him if he had continuity through the control circuit.
His answer was, “I’m a union electrician, I put power to the boiler and hook up thermostats; I don’t know about boiler wiring.” It was time for a field visit.
When I got to the jobsite, I checked the voltage for myself. I then went to the terminals marked T1 and T2. I installed a jumper and the boiler started right up. I now had the plumber and electrician standing there with a look of amazement on their faces.
I removed the jumper and walked over to the thermostat that our friend the electrician installed. I turned it all the way up — nothing. I knew the chance of 265 defective thermostats was as slim as 265 defective boilers, but I removed it from the wall and touched the wires together — still nothing. I left the wires crossed and was going to go back to the boiler and check the wire for continuity, but my way I saw two wires sticking out of the wall. I asked what they were; no one knew.
I placed a jumper on them and the boiler started. It seems that the electrician hooked the thermostat to the house intercom system — all 265 units had the thermostat wired to the intercom. The clocks even worked, since the intercoms were 24 V.
Now let’s learn some really basic stuff.

THE SIMPLE LIGHTBULB
I’m going to start with a lightbulb, make it work, then add a switch and explain how it all works together.On our lightbulb, L1 and L2 are the 120-V power source used to light the bulb. L1 is commonly referred to as the hot line and L2 as the neutral. L2, the neutral, will always be white; L1, the hot, will usually be black, but it can be any color except white, gray, or green. To make the bulb light, we have to complete a circuit from the power source with the electricity “flowing” from the source, through the hot wire, through the bulb, and back to the source through the neutral.
The 120-V source is usually a fuse or circuit breaker box. In residential applications, 120 V is needed for smaller appliances and lighting circuits. Some residential applications, such as electric water heaters, stoves, clothes dryers, and air conditioners, may require 240 V.
Most homes built after 1960 have a 240-V electrical service using circuit breakers. This is accomplished by bringing two 120-V lines through a meter into a circuit breaker panel. A third neutral line is also brought to the circuit breaker or service panel. Each hot leg feeds alternate breakers to supply 120 V to their respective circuits.
When 240 V are needed, a double circuit breaker is connected to each leg or phase to give us a 240-V line. Figure 1 shows a 240-V circuit breaker panel.

CIRCUIT BREAKER PANEL
Once the panel is in the house, a white wire is attached to the neutral bar and the line wire is attached to the breaker.Now let’s go back to our bulb. It’s attached to the panel box and the bulb is shining bright. How do we shut it off? We install a switch. (See Figure 2.) Notice that the switch is on the hot line.
Let’s look at the “flow” of the electricity again. If we break the circuit on the L2 or neutral side, the flow will stop and the light will go out, but there will be power at the light even when it is not lit. This is very important; if someone climbed on a ladder and touched one of the wires going to the light, he would get a shock. With the switch on L1 or the hot side, we interrupt the power before it gets to the light.
Next we are going to change the name of the lightbulb. We are just going to call it the “load.”
The load can be anything, a lightbulb, motor, gas boiler, or furnace. When we take a normal wall switch and turn it to the off position, we “open” the circuit. When the circuit is open, no electricity is “flowing” to the load.
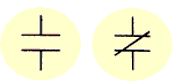
When we work on heating systems, our controls become switches. We have two types of switches, normally open and normally closed. To determine if a switch is normally opened or normally closed, you must determine its position with no outside force applied. The outside force can be manual, pressure, or temperature.
A pressure control on a steam boiler is a normally closed switch. With no pressure applied, the switch is in the closed position and the boiler operates; when the pressure climbs, the switch opens and the boiler shuts off.
Figure 3 shows the symbols you will see for normally open and normally closed switches. Once you understand what these symbols mean, you can figure out the operation of each control.
WIRING THE BOILER
The load is now a boiler. (See Figure 4, page 20.) This wiring diagram shows 120 V coming from L1 of a circuit breaker, through a switch, powering a boiler control and returning through L2, back to the neutral bar of the circuit breaker box.This is fine if the boiler is 120 V. However, most gas boilers you will be working on have 24-V controls. To get from 120 V to 24 V we use a transformer. A transformer does just what its name implies: It transforms voltage. If we’re going from a higher voltage to a lower voltage we use a step-down transformer; from a low voltage to a higher voltage, we use a step-up transformer.
A transformer is an iron core with windings placed on either side in relationship to the voltage reduction or increase. If we are going from 120 V to 24 V, we will have one-fifth as many windings on the 24-V side as on the 120-V side. This is the type of transformer you will find powering a gas valve. If we are going from 120 V to 10,000 V, we will have the amount of windings on the 120-V side times 83.333 to get the higher voltage. This is the type of transformer we will find on an electronic ignition.
Now let’s wire our boiler using a 24-V transformer.
The way this boiler is running now, we turn the switch on, the boiler runs turn it off, and the boiler shuts down. This obviously is not acceptable. The boiler would run constantly and would not be safe.
Different types of systems have different safety devices. A steam boiler (Figure 5) would have a pressure control as a high-limit control, a low-water cutoff as a safety device, and a thermostat setting the comfort level. There will also be a rollout switch, a flue spill switch, and a flue damper. Any wiring diagrams I show you will be for a standing pilot.
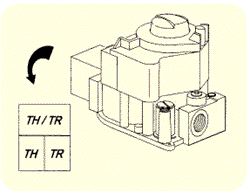
Before we wire the system, let’s look at a gas valve (Figure 6). This is what the terminal block looks like on a 24-V standing pilot gas valve. Bringing power to terminals TR and TH energizes the coil, which allows the flow of gas. Terminal TH/TR is a common terminal and is just a splicing point; no power is introduced to the valve at this point.
Now let’s wire our boiler with its gas valve. I’m going to remove the panel box and just discuss L1 and L2, the primary power going to the transformer.
Our boiler now has 120-V primary power going through a switch to a transformer supplying 24-V secondary power to the gas valve. All boilers and hot air furnaces that are vented through chimneys will have a spill switch, rollout switch, and flue damper. The flue damper motor is wired separately at terminals 1 and 4. When it proves open, it completes the 24-V circuit to the gas valve through terminals 2 and 3. Note: The vent damper has to prove open to close the control circuit through terminals 3 and 4.
All natural draft boilers will have a spill switch and a flame rollout switch. A spill switch is a thermal switch that is placed at the flue draft diverter; in the event of a blocked chimney this device opens an electrical circuit that turns off the flow of gas.
NEXT WEEK: We finish up the boiler wiring job.
This article was excerpted from The Complete Guide to Residential Gas Heating by Richard Bruno, an instructor in Nassau County BOCES, Nassau County, NY, and at the Suffolk County BOCES, Suffolk County, NY. He can be reached at 718-668-0180.
Publication date: 10/16/2000

Report Abusive Comment