Deer season has come and gone here in Central Kentucky, and those who deer hunt understand the importance of knowing the characteristics of deer. Failing to recognize their characteristics will likely end in a failed hunt and an empty freezer.
Thousands of dollars go toward buying the best accessories and weapons when it comes to equipping a hunter with the best tools of the trade.
However, the best accessories and weapons are useless unless hunters understand how to effectively apply them and recognize the characteristics of the animal they’re hunting. I’ve never met a successful hunter who consistently left his or her success up to guesswork. Most have a game plan and are students of the hunt.
These same techniques can also be applied to tracking down airflow restrictions in HVAC systems. So, consider this, how good are you at hunting airflow restrictions? Do you have a game plan or is it just guesswork? Let’s take a look at some ways you can more effectively hunt down pesky airflow restrictions that could be plaguing your customers’ HVAC systems.
ACCESSORIES FOR THE HUNT
To hunt down airflow restrictions, you’ll need the following test instruments and accessories to get started:
• A digital camera;
• An analog or digital manometer;
• One length of tubing (3/16-inch inside diameter [ID] neoprene works well);
• One Dwyer Model A-303 Static Pressure Tip;
• A 3/8-inch bullet-tip drill bit with a sheath to prevent drilling in too far;
• A 3/8-inch plastic test port plugs; and a
• Carrying Case.
If you’re going to hunt, you have to have the right stuff. Otherwise, you’re only posing as a real airflow hunter.
SCOUTING FOR AIRFLOW RESTRICTIONS
Good hunters scout their locations before starting any hunt. They look for visual clues that identify deer have been traveling in the area, signs of deer tracks, scrapes on trees, and frequently used trails. These are all visual indications that deer are present.
Airflow restrictions can have visual clues indicating they are present, too.
Your first step should be a visual inspection. What type of visual clues are you looking for? Check for the following when you suspect an airflow problem:
• Pinch points in flexible duct systems;
• Restrictive duct fittings;
• Improper flexible duct suspension;
• Branch ducts that are too long;
• Too many elbows;
• Dirty air filters; and
• Dirty blower wheels.
Your solution to an airflow restriction might be as simple as correcting one of the defects mentioned above. If you uncover one of these issues, take a digital photo and share your find. Customers like to see what was causing their pain. If the problem is a bit more complicated, and it often is, the hunt is going to get a lot more interesting and fun.
TIME TO HUNT
Some airflow restrictions will be harder to find and won’t provide any visual clues. You’ll need to go one step further to track them down. In this case, you have to identify the location of the airflow problem. Is it isolated to a particular room or area, or is the problem spread across the entire system?
If the problem affects the entire system, begin by measuring total external static pressure (TESP). Excessive TESP is a sign that a hidden airflow problem exists. It won’t identify the restriction as additional pressure tests will be needed to track it down. If the issue is isolated to a particular room or area, you can jump straight to measuring duct pressures to track down the problem.
START AT THE AIR-HANDLING EQUIPMENT
To pinpoint an overall airflow restriction, first measure TESP and then add air filter pressure drop and indoor coil pressure drop to this reading. This provides an overall picture of what’s happening with the system. To do this, you’ll need to install 3/8-inch test ports (drill holes) where air enters and leaves the equipment.
You’ll need to drill into areas that could cause refrigerant or water leaks so be careful. Use a drill bit sheath, so the drill bit only penetrates the metal 1/8th of an inch or so and doesn’t get pulled into the equipment.
Once test ports are installed, measure pressure entering and leaving the equipment and add these pressures together to determine TESP. The side of the system with the highest pressure reading is often where the airflow restriction is located. If measured TESP exceeds the air-handling equipment’s maximum rated TESP, an airflow problem likely exists.
AIR FILTER PRESSURE DROP
If the air filter is located at the air-handling equipment, start by measuring its pressure drop. Many times a clean filter made of a restrictive media type or one that is undersized in surface area will choke down airflow across the entire system.
Measure filter pressure drop by measuring pressure before and after the filter. Once these readings are obtained, subtract them from one another to determine filter pressure drop.
A properly sized air filter should typically have a filter pressure drop no more than 20 percent of the air-handling equipment’s maximum rated TESP. This rating is usually found on the equipment nameplate of the air-handling equipment. For a system rated at a maximum total external static pressure of 0.50 inch of water column, the pressure drop across the filter should not exceed 0.10 inch water column (20 percent x 0.50 - 0.10).
If the system you’re testing has a return air filter grille away from the equipment, you still measure filter pressure drop, just in a different location. Measure pressure drop across the filter by piercing the static pressure tip through the return air grille and filter.
Pressure drop will be read directly on the display of the manometer. If filter pressure drop is acceptable, continue hunting, you haven’t located the restriction yet. It’s time to move to the indoor coil.
INDOOR COIL PRESSURE DROP
Measuring indoor coil pressure drop is usually a roadblock for many hunters as they worry about piercing the coil and causing a refrigerant leak. If you carefully inspect behind coil access panels before drilling and use a drill bit stop or sheath, your chances of piercing a coil are greatly reduced.
To measure coil pressure drop, measure pressures before and after the coil. Once these readings are obtained, subtract them from one another to determine the pressure drop across the coil. Also, a wet coil will often have a significantly higher pressure drop than a dry coil.
A properly sized, clean coil should typically have a pressure drop no higher than 0.20 to 0.30 inch of water column. If the pressure drop exceeds this, it could be an indicator the coil is too restrictive for the proper amount of airflow.
ADD DUCT SYSTEM PRESSURES
When filter and coil pressure drop are acceptable, or your airflow problem is isolated to a particular room or area, look at supply and return duct pressures to continue hunting the airflow restriction. The pressure on either side of the duct system should not be higher than 0.10-inch water column.
First, measure the return duct pressure. If you measured filter pressure drop at the equipment, this will be the same pressure reading as the pressure entering the filter. Next, measure the supply duct pressure. If you measured indoor coil pressure drop, this will be the pressure reading taken in the supply plenum.
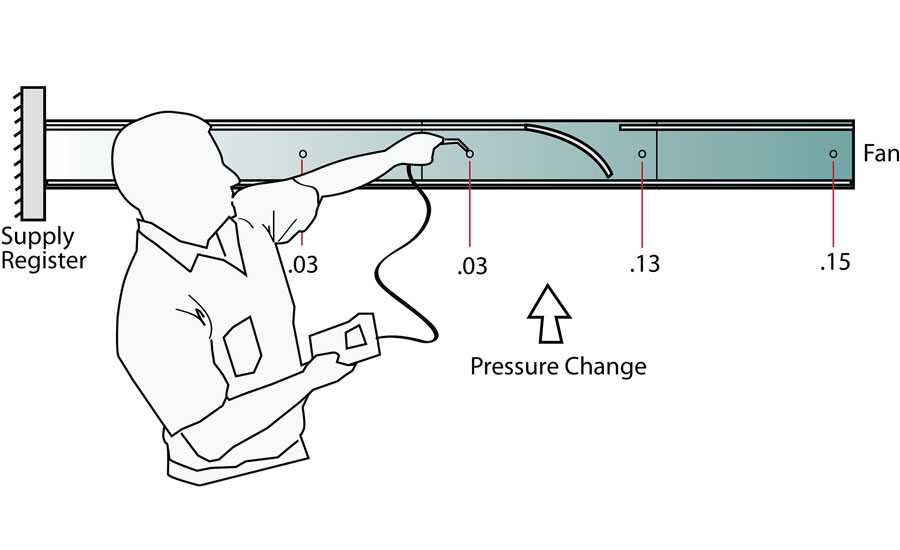
The side of the duct system with the highest pressure is the one that is the most restrictive and should be tested first. From the test location, start working down the duct system by installing test ports every 4 feet or so downstream. Be sure to measure the pressure drop across suspect duct fittings like sharp transitions and turns.
Once you identify a drastic pressure change, note what is inside the duct that could be causing it. Common causes include loose duct liner, closed fire dampers, and collapsed ducts.
Simply, when you find the resistance, you find the restriction — fix the resistance and you fix the airflow restriction.
Warning — just because you correct a duct pressure issue, it doesn’t mean the overall airflow issue has been fixed. You could still have issues with high static pressure or undersized ducts. It’s a good idea to measure total external static pressure just to ensure a hidden airflow problem doesn’t exist.
Hopefully, the next time you discover an airflow restriction, you’re better equipped to hunt it down. In some hunts, you’ll have to bring out specialized equipment, such as air-balancing hoods or anemometers, to continue tracking bigger game and larger trophies.
Publication date: 3/6/2017
Want more HVAC industry news and information? Join The NEWS on Facebook, Twitter, and LinkedIn today!


Report Abusive Comment