Many homeowners had a surprise this summer when they switched their thermostats to cooling. They expected cool air to blow out their supply registers, but instead, the air that came out was room temperature. The existing cooling system lived its useful life and was ready for a replacement. Time to change the indoor coil and outdoor unit.
While this sounds like an average day in the life of an HVAC professional, an unforeseen airflow problem could be lurking in this routine replacement. Let’s look at what could cause this issue and how you can ensure you don’t create this problem for your customers.
THE INDOOR COIL’S INFLUENCE
Newer high-efficiency indoor coils are being manufactured with more fins per inch than ever before. Older, low-efficiency coils often contain eight to 10 fins per inch while newer, high-efficiency coils have 14-16 fins per inch. In recent years, some manufacturers have made the move to 24 or more fins per inch.
This change has resulted in many newer coils being restrictive to airflow. When a new restrictive coil replaces an older, less restrictive coil, total external static pressure (resistance to airflow) of the equipment can increase as much as 200 percent of the equipment’s listed rating. This is often the cause for cracked heat exchangers and compressor failure. How can you avoid this problem?
DO YOUR RESEARCH UPFRONT
It’s important to determine the rated pressure drop of the replacement coil at required system airflow. Be sure you use the rated pressure drop of the coil when wet. A wet coil will have more pressure drop than a dry one. Coil pressure drop is available from each equipment manufacturer in its installation instructions or engineering data for the model you plan on using.
According to National Comfort Institute (NCI) studies of properly performing HVAC systems, coil pressure drop shouldn’t exceed 40 percent of the equipment’s rated total external static pressure. If equipment is rated at 0.50 inches of water column, the indoor coil pressure drop shouldn’t exceed 40 percent of a 0.50-inch rated fan or 0.20 inch of water column.
When researching coil rated pressure drop at required airflow, you’ll find coil rated pressure drops as high as 0.50 inch of water column. If the replacement coil has the same amount of pressure drop that the equipment is rated for, no available static pressure is left for the duct system and air filter.
You may need to consider other options to overcome the higher amounts of pressure drop found with some new coils. One such option is to recommend equipment replacement with a stronger variable-speed fan. Up to a certain limit, these fans can handle higher pressures, assuming the duct system and air filter are sized properly.
Once the replacement coil is chosen, it’s time to complete the installation. You’ll need to verify pressure drop across the replacement coil matches the rated pressure drop used to select it.
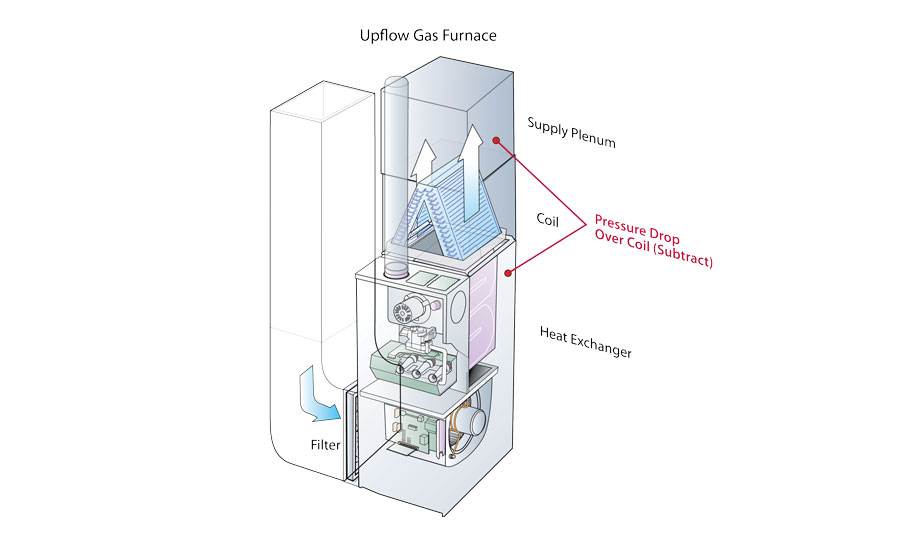
MEASURING INDOOR COIL PRESSURE DROP
Measuring pressure drop over an indoor coil requires a simple test, similar to measuring pressure drop over an air filter. Test ports need to be installed on both the entering and exiting air side of the coil.
The best time to install these ports is before installing the coil. That’s when you have access to the entire system and can see where your test ports will end up. You won’t have to worry about accidentally drilling into the new coil.
Before you can measure coil pressure drop, make sure you have the proper test instruments and accessories on hand. You’ll need the following:
• Manometer (analog or
digital);
• Test hoses (3/16-inch inner diameter);
• Static pressure tips;
• 3/8-inch drill bit with protective sheath;
• 3/8-inch test port plugs; and
• Manufacturer coil pressure drop data.
Once you have the proper test instruments, accessories, and coil data, you can begin testing. To measure coil pressure drop, follow these six steps:
1. Turn the system on at the thermostat. When testing in the cooling mode, be sure the equipment runs long enough to get the coil wet. If the system has a variable-speed fan, allow it adequate time to go through its ramping profile, too. It should be operating at 100 percent of programmed airflow;
2. Install a test port into the air handling equipment on the entering air side of the coil by drilling a 3/8-inch test hole. This will be your pressure measurement before the coil as air enters it;
3. Install a test port into the supply plenum or duct on the exiting air side of the coil by drilling a 3/8-inch test hole. This will be your pressure measurement after the coil as air leaves it;
4. Setup your manometer in an easily accessible location. If you’re tool of choice is an analog manometer, level and zero it before using. Attach a hose to each pressure tap on the manometer and insert a static pressure tip into the opposite end of each hose;
5. Insert the static pressure tips into the 3/8-inch test ports you drilled on each side of the coil. Be sure to face the static pressure tips into the airflow; and
6. The operating pressure drop over the coil will appear on the display of your manometer. Record this reading to compare against manufacturer rated pressure drop. Record the model number of the coil and install test plugs in your test ports when finished.
COMPARE MEASURED PRESSURE DROP TO MANUFACTURER DATA
Once you know the coil’s condition (wet or dry) and the measured pressure drop, you can determine if the pressure drop is in an acceptable range for the coil. Measured pressure drop should be close to rated pressure drop if the fan is moving the proper amount of airflow.
Using the manufacturer’s coil data, locate the model number matching the installed coil. Next, find the required airflow across the coil and locate the column representing the condition of the coil in its current operating mode, wet or dry.
Next, connect the two plotted points from the wet/dry coil condition and the fan airflow column to determine your target pressure drop. The point where the two lines intersect is the amount of pressure drop the coil should have if the required fan airflow is moving across it. This value should be very close to your measured pressure drop.
For the best results, verify the airflow moving through the coil matches system design airflow. Leaving this step out may cause you to misinterpret your test results.
WHAT IF THE PRESSURE DROP IS OUT OF RANGE?
There will be times when the rated coil pressure drop doesn’t match the actual pressure drop measured in the field. This can happen for several reasons — many of which are installation-related. These include:
• Fan airflow is set incorrectly;
• Flanges are not bent up on the coil cabinet;
• Restrictive duct transitions at the coil;
• Improperly blocked-off sections on the coil discharge;
• Plastic caught in the coil;
• Improper determination of fan airflow (not enough or too much); and
• Wrong model number coil used.
One last note: Be careful when using coil pressure drop tables to determine fan airflow on a coil. Plotting airflow from a coil pressure drop measurement on a restricted coil will show much higher airflow than the system actually possesses. When you need to determine fan airflow, this isn’t the method to use.
Publication date: 6/13/2016
Want more HVAC industry news and information? Join The NEWS on Facebook, Twitter, and LinkedIn today!


Report Abusive Comment