
Figure 1. Main compressor on the right and back-up compressor on the left.
BACK-UP COMPRESSOR
If the main compressor for an HVAC pneumatic control system fails, all the HVAC equipment will shut down in the building. That’s why it is a good idea to have a back-up compressor to use in case of emergency.Figure 1 shows a main air compressor that feeds an HVAC pneumatic control system. The silver back-up compressor is on the left. The compressors are equipped with quick connection fittings.
The back-up compressor allows a building engineer/maintenance supervisor to get the system back on-line within minutes with minimal disruption to the building occupants. In addition, the back-up compressor allows you to do routine maintenance during normal working hours such as changing the oil, belts, and air filters.
I suggest that you review building mechanical and electrical systems and apply back-up systems where possible.
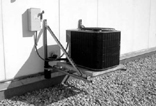
Figure 2. Air conditioning condensing unit installed on boiler room wall instead of on the roof surface.
MOUNTING A/C UNIT ON THE ROOF
An air conditioning condensing unit can be mounted on the boiler room wall instead of being set on the roof surface. Attach the unit to the wall with a bracket system (Figure 2). Wall mounting has several advantages:• Quick access for roof inspections, repairs, and replacements.
• Less cost for all roof work.
• Protection for the unit since it does not need to be disturbed while the roof is being worked on.
• Less cost in time and money for investigation and reports if the unit should be damaged.

Figure 3. A light bulb is an inexpensive electric heater to expand replacement bearings.
HEATER FOR REPLACEMENT BEARINGS
Heaters to expand replacement bearings are expensive, but you can build a bearing heater quickly for a few dollars.Figure 3 shows a bearing heater I made with a 300-watt standard light bulb. An electric motor bearing sits on top of the light bulb. The heat from the bulb expands the bearing enough so it can be easily slipped on the shaft. This bearing heater works great.

Figure 4. Fabricated flow hood.
FABRICATE YOUR OWN FLOW HOOD
I created my own flow hood (Figure 4). It comes in handy when measuring changes in airflow for 2- x 2-foot supply grilles.My inexpensive flow hood is made with a purchased drop-in supply grille turned upside down. You could use an old grille if you have one. My flow hood includes the following, as shown in Figure 5:
• Purchased 2- x 2-foot drop-in supply grille.

Figure 5. Design of flow hood you can make.
• Weather stripping.
• Surgical hose.
• Magnehelic gauge.
The duct cap is sealed to the bottom of the supply grille with silicone.

Figure 6. Fabricated fittings.
FABRICATING PLUMBING AND PNEUMATIC FITTINGS
I have come across several situations where special plumbing and pneumatic fittings are needed. Sometimes the fittings are hard to locate or they are not manufactured. Using 95/5 solder, I have soldered together various copper and brass fittings in order to obtain the proper connections. Keep in mind that brass can easily be soldered to copper, or brass can be soldered to brass, to obtain almost any fitting needed.For example, the top fitting in Figure 6 was made for an icemaker. I had to remove an icemaker and take it to the boiler room for repair. I used a garden hose and the boiler room slop sink to provide temporary water supply to the unit. To do this, I made the fitting in Figure 6. One side of the fitting attaches to a standard garden hose and the other attaches to the unit make-up water line.
Excerpted and reprinted fromGreen Tips for Building Maintenance Engineersby Robert Boyll, one of the books in the Indoor Environment Technician’s Library series published by LAMA Books. For more information, visit www.lamabooks.com.
Publication date:02/07/2011

Report Abusive Comment