
Figure 1. Cut off the fitting so that the side measures 16 inches.
You have to know how fittings are made before you can alter them. If you learned sheet metal pattern drafting the old-fashioned way at the layout bench, you’re all set. However, if you’ve always worked at a shop with modern computerized layout machines, you may be at a disadvantage when it comes to modifying fittings in the field. In that case, a thorough reading of the bookLayout for Duct Fittingsby Leo A. Meyer (part of the Indoor Environment Technician‘s Library series published by LAMA Books) would be very helpful.

Figure 2. Typical two-piece transition.
SHORTENING A FITTING
On a recent job I had a duct run go from 20 x 10 to 16 x 10, but the shop mistakenly sent out a 20 x 10 to 14 x 10 transition fitting. Rather than order a new fitting (which would have caused a delay for me and extra time and expense for the shop) I field-modified the fitting. I decided I could cut off the fitting at the point where the side measured 16 inches (Figure 1). This made a shorter fitting, but I could make other adjustments so that the short fitting was still acceptable. However, in other situations, a shorter fitting would not be acceptable.I prefer to disassemble the fitting before I cut it off. I think it is easier to make the modifications that way, and that it makes a more finished product.
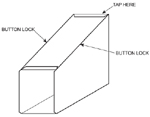
Figure 3. Tap on side to slide button lock apart.
After the fitting is disassembled, cut the pieces to the proper dimensions. Be sure to leave enough material for the S & drive connection. Before you reassemble the fitting, the multiple thickness of the button lock or the Pittsburgh lock has to be cut back 1 inch, flattened, and notched for the S & drives. Open up the lock and cut the double thickness back an inch so that the last inch can be flattened and notched for S & drives.
I use a folding tool (Figure 4) to turn the edges for the drive cleats and a hand seamer (hand tongs) to flatten it. In some cases I also use a hand seamer to turn the edge.

Figure 4. Use a folding tool to turn edges for drive cleats.
CUTTING OFF A FITTING
To modify a fitting that can’t be taken apart readily - for example, to shorten a large supply air fitting at the air handling equipment - I cut it off with straight snips or aviation snips. You can use bulldog snips to cut the many folds at the corners. However, the cuts at the corners are rather difficult to make and it is hard on the snips. Usually I make the corner cuts with a cutting wheel in my 4-1/2-inch grinder and finish the cuts with straight snips. Another way is to cut the corners with a hacksaw or a metal cutting blade in a reciprocating saw and finish the side cuts with straight snips.CUTTING STRAIGHT DUCT
Cutting straight pieces of duct in the field is easy. I lay a half section on my temporary work bench (a hollow core door on a pair of sawhorses) with the short side hanging down off the side of my bench. I mark the length with a felt tip pen and a framing T or framing square, allowing for S & drives. I then cut the folds of the button lock with bulldog aviation snips and then cut up the rest of the way on the short side with straight snips. I cut the long side from the other side of the bench. If the drop-off is less than 12 inches, I cut to get rid of the short side waste and then finish the cut on the long side from the same side of the bench. I cut away the folds of the lock, and notch for S & drives.MAKING NARROW DUCT FROM WIDE DUCT
Making a piece of narrower duct from a piece of wider two-piece duct is easy, especially if it is short (36 inches or less). For example, you need 24 inches of 14 x 8 duct, but the only pieces on the job are 16 x 8. Cut the 16 x 8 pieces to 14 inches wide plus the 3/8-inch allowance for the button lock edge. Use a folding tool to turn the 3/8-inch edge (or use hand tongs). Add buttons to the edge with a button lock (snap lock) punch and assemble.Excerpted and reprinted fromTips for Residential HVAC Installationby Larry Gardner, one of the books in the Indoor Environment Technician’s Library series published by LAMA Books.
Publication date:09/22/2008

Report Abusive Comment