Unfortunately, there is a history of many technicians taking shortcuts when making these measurements. To speed the process, some make assumptions without taking measurements and some use inadequate instrumentation. There are even some contractors who tell their technicians not to connect to the valves for testing pressure on suction or liquid lines for fear of releasing refrigerant.
Bill Brown, HVAC instructor at Brownson Technical School in Anaheim, Calif., knows this all too well.
“Once some technicians get to the field, they take shortcuts,” said Brown. “For instance, instead of measuring suction line temperature, a technician will wrap his bare hand around the pipe and judge by feel. We call it the beer can syndrome: ‘If it’s as cold as good, cold beer, the system is charged’.
“We do everything to discourage this kind of sloppiness, but once they’re in the field, we have no control. One of the reasons some techs cut corners is because some measurements are difficult and time-consuming to take and they’re under pressure to get on to the next job.”
Such “guesstimates” result in overcharged or undercharged systems that burn power and operate below optimum levels. In many cases, an inappropriate refrigerant charge can lead to compressor burnout.
The most common place for cutting corners is the charging/recovery phase of superheat/subcooling - the place where the beer can syndrome is most common.
“Once you have determined the target superheat or subcooling, the most tedious task begins,” said Brown. “You have your suction or liquid line temperature, you connect your gauge to the Schrader fitting and get the pressure, do the calculations, and determine if the unit is undercharged or overcharged. Then you either add or subtract refrigerant, guessing the amount, disconnecting the hose, reattaching your gauge, reading it, adding or subtracting more refrigerant, and repeating the process until you hit the right charge. It’s tedious and that’s why a lot of technicians use short cuts.”

After hanging the instrument, the technician slowly turns
the valve of the refrigerant bottle, adding refrigerant until the correct
superheat temperature is indicated on the instrument.
MAKE MEASUREMENTS ACCURATE THE FIRST TIME
To find the best way to measure superheat, we went to the horse’s mouth and asked some HVAC instructors how they taught superheat and what instruments they recommend to make superheat/subcooling measurements faster and easier. According the HVAC instructors interviewed, taking the temperature measurements to determine the target superheat or subcooling is not that difficult. Getting accurate measurements, however, isn’t always that easy.What the technician needs, in addition to basic superheat knowledge, are the proper modern measuring tools.
First, to determine the target temperature, the instructors recommend that the technician take the outdoor air temperature from the air that is going into the condenser coil. Then he must determine the wet bulb temperature from in front of the indoor return grille, or better yet, just in front of the evaporator coil.
“The dry bulb temperature is obvious,” said Les Haddix, an HVAC instructor at Sequoia Institute in Fremont, Calif. “But a lot of technicians think that wet bulb refers only to indoor comfort. In reality, it is very important in determining the right superheat.
“One of the short cuts a lot of people use is to assume a relative humidity of 50 percent when determining superheat. But that’s just the system’s design parameter. If the relative humidity is higher than that and the technician assumes 50 percent, he will overcharge the system. If it’s lower, he will undercharge.”
Armed with these two measurements, the tech refers to the manufacturer’s display chart displayed on the unit, usually with wet bulb temperature across the top and dry bulb along the side. The ideal target superheat is displayed where the two intersect.
When the technician has determined the target temperature, he needs only two more numbers: the boiling point (saturation point) of the refrigerant and the suction/liquid line temperature. Since most technicians are still working with gauges, they need to get the suction or liquid line pressure and convert that into temperature. To determine the temperature of the refrigerant in the suction line, all the technician needs to do is measure the temperature of the pipe. When the technician has the two, he calculates the superheat/subcooling.
After selecting the correct refrigerant (R-22 in this
example), the technician connects the refrigerant hose to the “T” of the
superheat/subcooling instrument.
IT DEPENDS ON THE INSTRUMENTS
Unfortunately, as many technicians can attest, it sounds a lot easier than it is. There are two problems - the accuracy of the measurements in the first place and the difficulty in calculating the amount of refrigerant to add or subtract from the system.The three temperatures are not as easy to take as it would seem. While instrument suppliers have spent a lot of time developing better instruments, many have missed problems faced by field service technicians in the real world.
•Outdoor air temperature:Although this is the most obvious and easiest superheat measurement to take, it still requires accuracy and temperatures can vary considerably in the area around the condenser.
“We used to use an analog thermometer in class,” said Bob Featherstone, an instructor at Oakland School of Technology in Hazel Park, Mich. “But it took too long to get the right reading and it was a chore to hold it in position. We started using a stick meter with a K-type thermocouple and got the job done faster and more accurately. One really nice feature of the one we use is that it has an alligator clip on the sensor so you can clip it right in front of the condenser coils and don’t have to stand there holding it.”
The greater accuracy is achieved by paying attention to some subtle differences that occur uniquely in the field. With the most common K-type thermocouple thermometers, there is a temperature reference junction inside the meter (the “cold junction”) that is monitored by a thermometer inside the meter. Both the reference junction and the thermometer need to be at the same temperature to ensure an accurate reading.
Some meters employ an adapter, with the reference junction inside this adapter. Any difference in temperature between the external reference junction in the adapter and the internal thermometer inside the meter will show up as an error. By simply holding this adapter in your hand, you can alter the reading that the multimeter displays.
•Wet bulb indoor air measurement:Indoor wet bulb temperature measurement also presents a problem. The “wetting” material is difficult to find and also to affix on a thermocouple.
Technical articles, manuals, and educational texts suggest such things as moistened toilet tissue and paper napkins. One major instrument manufacturer suggests a piece of cotton shoe lace, thus sending technicians on a fruitless quest since modern shoe laces are made of synthetic materials and blends.
This nuisance factor is one of the reasons some techs take a short cut here, assuming a relative humidity of 50 percent. In addition to offering a K-type thermocouple made especially for taking wet bulb measurements that includes a permanently attached “sock,” there are some test heads available that provide immediate measurements for wet bulb, relative humidity, and dew point.
“I’ve been using one of these heads recently in my classes and it works very fast with high accuracy,” said instructor Brown. “This is an instrument that should take all of the pain out of wet bulb measurements.”
•Suction line measurement:The last measurement presents an even bigger source for potential errors. The suction line temperature cannot be measured with a simple pocket thermometer because the thermal contact with the pipe is not good enough and the thermal contact with the ambient environment is too good. The resulting temperature would be somewhere between the pipe temperature and the air surrounding it. The trick is for the technician to find a way to measure only the pipe temperature.
One way involves the use of a standard beaded thermocouple.
“The key is isolating the thermocouple’s bead from the surrounding environment so it’s only taking the pipe temperature,” said Bob Wilson, a paraprofessional who works with Featherstone. “One way is to push the beaded thermocouple under the pipe insulation, but that only works if the insulation is dry and fits tightly.”
He said Fieldpiece offers another solution by providing thermocouples with about an inch of insulation cut back from the bead. “The technician wraps the whole inch of bare wire around the pipe and holds it in place with a provided Velcro strip, assuring isolation from the environment,” he said.
Haddix agrees with this method of isolating the thermocouple bead to take a pipe temperature, but he feels it is still a little too time consuming.
“Anything that requires time for pipe temperature measurement leaves open the temptation to use the ‘beer can’ estimate,” he said. “That’s why I’m looking into a pipe clamp thermocouple that attaches right to the pipe and seals out ambient air. It looks like a great idea, and I’m going to give it a shot. It’s the next purchase on my list.”
Only if the proper instruments and procedures are employed can optimum superheat and subcooling be achieved and true SEER ratings be maintained.
Sidebar: He Likes It, He Likes It
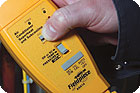
Instructor Bill Brown of Brownson Technical School in Anaheim, Calif., said he discovered something that provides a solution to the tedious repetition of properly charging a system. His school recently acquired a new instrument from Fieldpiece Instruments that, in his estimation, streamlines several facets of superheat/subcooling: the SSX34.“It attaches directly to the suction or liquid line. It also comes with a thermocouple clamp designed to measure the line’s temperature,” he said. “When it has those measurements, it automatically calculates and displays the superheat or subcooling. The technician doesn’t have to do the math.”
But the best part about the instrument, said Brown, is the fact it enables a technician to attach a refrigerant cylinder or recovery cylinder while the instrument is still connected to the line.
“You can then add or subtract refrigerant and see the results on the instrument in real time,” he said. “It’s a nice smooth way to look at your superheat and to fill to it. It will certainly make the technician’s job go a lot faster without costing any accuracy.”
Publication date:06/11/2007


Report Abusive Comment